All Posts By:

Chelsea

Food Safe DIY Jack Skellington Cake Stand

on September 26, 2017

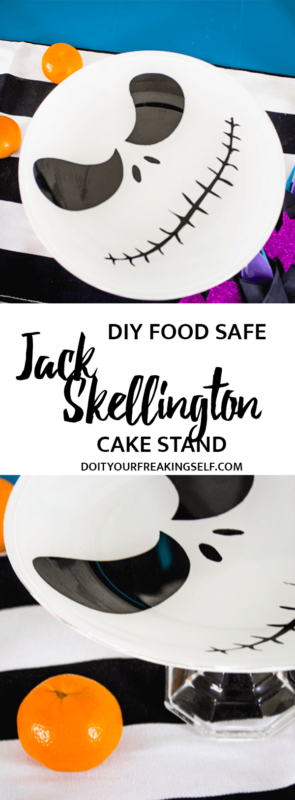
Scare up a good treat by making a simple DIY Jack Skellington Cake stand! Perfect for your Halloween decor or party tablescape! Dollar Store DIY!

Scare up a good treat by making a simple DIY Jack Skellington Cake stand! Perfect for your Halloween decor or party tablescape! Dollar Store DIY! - Nightmare Before Christmas | Tim Burton | Food Safe | Halloween Projects | Party table - Doityourfreakingself.com

Do you ever have those movies that you’re maybe glad you didn’t see as a kid but are also your favorites? I was not allowed to see Nightmare Before Christmas when it came out. Granted, I was about 5 years old with an overactive imagination so this was probably a good decision on my parent’s part. And while I still have quite the imagination, this film has become one of my absolute favorites… At this time of year especially.

MAKE IT: NIGHTMARE BEFORE CHRISTMAS ZERO PILLOW PAL

Also, Hocus Pocus! I saw that movie when I was 7 and it (for some reason) scared the bejebus out of me! I don’t think my parents ever would have let me see it at that age, but we were at a neighbors house and no one really told our parents what we were watching. I spent the entire walk home thinking Billy Butcherson was chasing me and that I should never light a black candle. Like… ever. Now… I love that movie! It is so delightfully campy and I can’t figure out why I was scared in the first place. However, I probably would have loved it anyway so there’s that.

Scare up a good treat by making a simple DIY Jack Skellington Cake stand! Perfect for your Halloween decor or party tablescape! Dollar Store DIY! - Nightmare Before Christmas | Tim Burton | Food Safe | Halloween Projects | Party table - Doityourfreakingself.com

Okay so yes, I had protective parents. But a part of me is glad they understood me enough to not let me give myself nightmares.

Anyway!!! Welcome the Halloween Season! I’m so glad you’re here! It’s probably my favorite because it is also fall and I can wear sweaters with Star Wars characters on them and not get funny looks. This year, I’m hosting a Tim Burton inspired Halloween party so I KNEW I needed to create something Jack themed. This Food Safe DIY Jack Skellington Cake Stand cost me $10 MAX and I can’t wait to show you how to make it!

Food Safe DIY Jack Skellington Cake Stand
Scare up a good treat by making a simple DIY Jack Skellington Cake stand! Perfect for your Halloween decor or party tablescape! Dollar Store DIY! - Nightmare Before Christmas | Tim Burton | Food Safe | Halloween Projects | Party table - Doityourfreakingself.com

Time: 30 minutes + Heat/Dry Time
Cost: $10 or less
Spooky Level: 2

Scare up a good treat by making a simple DIY Jack Skellington Cake stand! Perfect for your Halloween decor or party tablescape! Dollar Store DIY! - Nightmare Before Christmas | Tim Burton | Food Safe | Halloween Projects | Party table - Doityourfreakingself.com

Supplies:
9″ Clear glass plate – I got mine from Ikea but you can get the same ones from amazon.
Multi Surface or enamel paint in black and white
Paintbrush and large foam pouncer
Clear spray sealant (optional)
Glass candle stick – I got mine from the dollar store
E6000 Glue
Printout of Jack’s Face – I sized mine to be 7.5 inches just to give myself some room – you can do this by either loading it into a photo editor or playing around with the scale.


Start by cleaning the back of your plate with rubbing alcohol.

Place the Jack Skellington face on your surface with the plate FACE DOWN over it. This will give you a guide to paint the face!

Scare up a good treat by making a simple DIY Jack Skellington Cake stand! Perfect for your Halloween decor or party tablescape! Dollar Store DIY! - Nightmare Before Christmas | Tim Burton | Food Safe | Halloween Projects | Party table - Doityourfreakingself.com

Using a paintbrush and black enamel paint carefully paint the design on the back side of the plate. Allow it to dry then add a second coat. Let it dry for at least 2 hours.

Scare up a good treat by making a simple DIY Jack Skellington Cake stand! Perfect for your Halloween decor or party tablescape! Dollar Store DIY! - Nightmare Before Christmas | Tim Burton | Food Safe | Halloween Projects | Party table - Doityourfreakingself.com

Scare up a good treat by making a simple DIY Jack Skellington Cake stand! Perfect for your Halloween decor or party tablescape! Dollar Store DIY! - Nightmare Before Christmas | Tim Burton | Food Safe | Halloween Projects | Party table - Doityourfreakingself.com

After painting the face, it’s time to fill in the back. I originally used spray paint but it ended up bubbling and probably wouldn’t have held up after washing. SO! Switching tactics, using white enamel or multi surface paint and a large foam pouncer, fill in the back of the plate. Make sure to paint over the black areas too so the plate will look good from all angles. Let it dry for an hour and go back in for a second coat or just fill in patchy places.

To heat set your paints PLEASE follow the instructions on your paint. Each kind is different with different dry times and I don’t want to tell you different.

I let mine dry for 1 hour then set the plate in a COLD oven paint side up. I then heated the oven to 350 then let it cook for 30 minutes once it hit temperature. After that I let it cool IN THE OVEN with the door open.

Once your paint is set, it’s time to add the stand part. I’ve seen people use other things like painted vases or wooden candle sticks so just find what you like. You do you girl! I chose the candle stick because I happened to have a few in craft storage and figured I should probably use it.

Scare up a good treat by making a simple DIY Jack Skellington Cake stand! Perfect for your Halloween decor or party tablescape! Dollar Store DIY! - Nightmare Before Christmas | Tim Burton | Food Safe | Halloween Projects | Party table - Doityourfreakingself.com

Mark the center of the plate – I measured 4.5 inches in from the edges – and use E6000 glue to secure the candle stick to the bottom of the plate. Let it dry overnight and you’re good to go!

Scare up a good treat by making a simple DIY Jack Skellington Cake stand! Perfect for your Halloween decor or party tablescape! Dollar Store DIY! - Nightmare Before Christmas | Tim Burton | Food Safe | Halloween Projects | Party table - Doityourfreakingself.com

Scare up a good treat by making a simple DIY Jack Skellington Cake stand! Perfect for your Halloween decor or party tablescape! Dollar Store DIY! - Nightmare Before Christmas | Tim Burton | Food Safe | Halloween Projects | Party table - Doityourfreakingself.com

Use your DIY Jack Skellington Cake Stand as a cake stand or a cookie display! You can also use it as a jewlery holder or really whatever you’d need it for!

Scare up a good treat by making a simple DIY Jack Skellington Cake stand! Perfect for your Halloween decor or party tablescape! Dollar Store DIY! - Nightmare Before Christmas | Tim Burton | Food Safe | Halloween Projects | Party table - Doityourfreakingself.com

SaveSaveSaveSaveSaveSaveSaveSave

SaveSave

Pumpkin Spice Latte Cupcakes

on September 20, 2017

Get into the fall spirit with these delicious and decadent Pumpkin Spice Latte Cupcakes! Sure to be a crowd pleaser for all the pumpkin spice lovers!

Get into the fall spirit with these delicious and decadent Pumpkin Spice Latte Cupcakes with cinnamon cream cheese frosting! - Do It Your Freaking Self - fall | easy | diy | homemade | with a mix

Okay, so fall is here and I am fully embracing my basic-ness. We just got through a heatwave in LA – which I am not proud to say I complained the entire time – and the weather has been dropping to mid-70’s most days. Now, I’m not going to say this is perfect weather for boots and sweaters but I am hauling them out… because it never hurts to be prepared.

Speaking of hauling out the fall clothes, I kinda got rid of a lot of mine when I tried to be a minimalist earlier this spring. I say try because Kon Mari never mentions being a blogger and/or babysitter and actually needing an over abundance of craft supplies. I got as far as getting rid of clothes and a few old craft supplies. If you’re a blogger or mom or teacher, you totally understand that you’re just going to end up buying more craft supplies so it’s this really vicious cycle.

Get into the fall spirit with these delicious and decadent Pumpkin Spice Latte Cupcakes with cinnamon cream cheese frosting! - Do It Your Freaking Self - fall | easy | diy | homemade | with a mixAnyway! Back to when I tried to Kon Mari last spring. I basically got rid of all of my pants, boots that I hadn’t worn in a while, some sweaters, and generally all things fall. Now that it’s time to pull those things out? I’m down to a Star Wars sweater and my Union Suit collection. It’s rough guys. I know I should look at this as an opportunity to go shopping, but when you’re a plus size lady on a budget options are limited. If you’ve got suggestions PLEASE leave them in the comments! Have you ever gotten rid of things then realized it was probably not a good idea?

Get into the fall spirit with these delicious and decadent Pumpkin Spice Latte Cupcakes with cinnamon cream cheese frosting! - Do It Your Freaking Self - fall | easy | diy | homemade | with a mix

Needless to day, I needed a cupcake when I realized how much adulting I had to do, and what better way to kick off the season than some Pumpkin Spice Latte Cupcakes! This recipe is one of my favorites to pull out during the season and is always a crowd pleaser at work parties!

Get into the fall spirit with these delicious and decadent Pumpkin Spice Latte Cupcakes with cinnamon cream cheese frosting! - Do It Your Freaking Self - fall | easy | diy | homemade | with a mix

Continue reading

DIY Harry Potter Makeup Brushes

on September 12, 2017

Create your own magical Harry Potter Makeup Brushes for under $10! You may not be able to levitate your eye shadows, but these brushes will take your makeup game to a whole new spellbinding level.

Let me start this off by saying that I have been binge listening to The Quibbler Podcast and it is amazing and you should go listen to it ASAP. Okay… on to the story…

Create your own magical DIY Harry Potter Makeup Brushes for under $10! These brushes will take your makeup game to a whole new spellbinding level.

Hands up if you have no clue about the difference between a blender brush and an angle brush! Do they put color on my eyelid? That’s all I need. I have a confession to make though, I own so many eyeshadow pallettes it’s sad and there’s only so many youtube beauty vloggers/tutorials I can deal with on a weekly basis. And to be honest, I really only enjoy watching Kimberly Clark. So a lot of my eyeshadow gets used once while I’m experimenting because well… putting on makeup is not really something fun for me.
Create your own magical DIY Harry Potter Makeup Brushes for under $10! These brushes will take your makeup game to a whole new spellbinding level.

Make it: Hogwarts House Crochet Ear Warmers

Create your own magical DIY Harry Potter Makeup Brushes for under $10! These brushes will take your makeup game to a whole new spellbinding level.

I’m trying though! I’m really trying! I know that you don’t really NEED makeup to look beautiful and all that, but for me it at least makes my mornings look like I tried to be a functional adult. These Magic Wand Harry Potter Makeup Brushes though? They kinda make me want to actually do my makeup because it just gives me a chance to use them. That and I can turn on the Harry Potter soundtrack and pretend to cast a floating charm on Grampa the Cat (It has never worked because I never got my Hogwarts letter and I am still bitter about that)

Create your own magical DIY Harry Potter Makeup Brushes for under $10! These brushes will take your makeup game to a whole new spellbinding level.

Harry Potter Makeup Brushes

Time: 2-3 hours – Paints gotta dry!
Cost: $10 or less
Magic or Muggle? Muggles can totally use them but we cannot be blamed for any magical malady that may occur from misuse. Continue reading

Flat Knit Jayne Cobb Hat Pattern from Firefly

on September 5, 2017

Curse your sudden but inevitable betrayal! Knit a Jayne Cobb hat on straight needles with this free knitting pattern. A geeky project for beginners and intermediate knitters.

Knit a Jayne Cobb hat on straight needles with this free knitting pattern. A geeky project for beginners and intermediate knitters.

Okay not really, but I’ve always wanted to say that to someone and what better time to say it than in a Firefly themed post! Yep, the geek is coming out and I can’t stop her…. nor do I want to.

Do you guys ever have those favorite shows that you can probably quote word for word because you’ve watched them a million times and actually have conversations about them with friends? If you haven’t had those conversations, hit me up. I’d be happy to be that person.

Knit a Jayne Cobb hat on straight needles with this free knitting pattern. A geeky project for beginners and intermediate knitters.

Anyway! What I’m trying to say is that we all have those shows. Firefly is one of them for me. As of this writing, I have watched the entire series and the movie at least 5 times and I watched it again while making a few of these hats… so you know, nerd card intact and all.

Flat Knit Jayne Cobb Hat Pattern

This Jayne Cobb Hat pattern is knit on straight needles so there are a few extra stitches on the edges for you to sew them together. I knit 90% of my hats flat because its just easier for me to figure out on the decrease. If you’re a beginner knitter who finds circular needles daunting, this is a great tutorial for you. This Jayne Cobb hat is also worked with 2 strands to give it a more bulky look and feel like in the show.

Knit a Jayne Cobb hat on straight needles with this free knitting pattern. A geeky project for beginners and intermediate knitters.

Supplies:
Size 10 knitting needles
Yarn or Tapestry Needle
Scissors
Redheart Yarn in : Carrot, Gold, and burgundy (or red)
Large pom pom maker

Stitches to know
Knit, Purl, SSK, K2tog, sl

Starting with 2 strands of Carrot – Cast on 84 stitches.
Row 1: K2, *K1, P1, Repeat from * until last 2 stitches. K2 Turn
Row 2: P2, *P1, K1, Repeat from * until last 2 stitches. P2 Turn
Row 3: Knit across
Row 4: Purl across
* Repeat rows 3 and 4 until your hat measures 2 inches ending on a purl row
Change yarn to Gold
* Repeat rows 3 and 4 until your hat measures 7-7.5 inches ending on a purl row

Decrease:
Row 1: Knit 2, k2tog across until last 2 stitches, Knit 2 (44 stitches)
Row 2: Purl across
Row 3: Knit 2, k2tog across until last 2 stitches, Knit 2 (24 stitches)
Row 4: Purl across
Row 5: Knit 2, k2tog across until last 2 stitches, Knit 2 (14 stitches)
Row 6: Purl across
Cut an 8 inch tail and thread it through the 14 loops and cinch. Mattress stitch the hat together.

Knit a Jayne Cobb hat on straight needles with this free knitting pattern. A geeky project for beginners and intermediate knitters. Knit a Jayne Cobb hat on straight needles with this free knitting pattern. A geeky project for beginners and intermediate knitters.

Ear Flaps:
Using 2 strands of Burgundy or Red worsted weight
Count 15 stitches over from left back seam and pick up 20 knit stitches along the edge. – I pick my stitches up in the knit stitch so the next row will be a purl row. You want the messy back part to be facing inward.
Row 2: Sl 1, Purl 19
Row 3: Sl 1, Knit 19
Row 4-10: Repeat rows 1 and 2
Row 11: Sl 1, K 1, SSK, Knit to last 4 stitches, k2tog, K1
Row 12: Sl 1, Purl
Repeat Rows 11 and 12 until there are 6 stitches left, ending on a purl row

Knit a Jayne Cobb hat on straight needles with this free knitting pattern. A geeky project for beginners and intermediate knitters.

To finish earflaps:
Row 1: Sl 1, K1, SSK, Knit 2
Row 2: Sl 1, Purl to end
Repeat rows 1 and 2 until 3 stitches remain. K3tog and bind off. Leave a 6 inch tail

Repeat the above for the second ear flap. The easiest way I found to make sure my flaps were even is fold the hat in half and mark where the stitches of the made earflaps are. You can also count over 35 from the seam edge and work your 20 stitches back from there if you want to make sure numbers are even.

Knit a Jayne Cobb hat on straight needles with this free knitting pattern. A geeky project for beginners and intermediate knitters.

Hopefully at some point I’ll have a video for you guys to actually explain things. Let me know if that would be more helpful.

Use the yarn needle to weave in your ends.

Knit a Jayne Cobb hat on straight needles with this free knitting pattern. A geeky project for beginners and intermediate knitters.

To create the pom pom, I used all three colors with the large pom pom maker from Susan Bates – I know I said I hated pom poms, but these things are so stinking easy! Use the yarn needle to attatch it to the hat, weaving the ends through the top cinch in your hat and down the inside seem so it’s invisible.

You are now ready to join the browncoats be a cunning damn little hero! We shall sing your song through the annals of history!

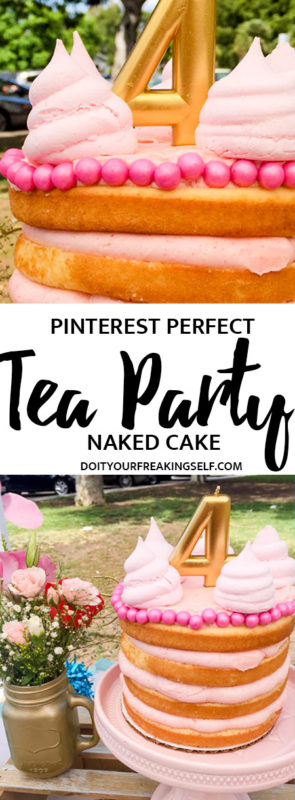
A Pinterest Perfect Tea Party Cake

on August 29, 2017

Create a simple yet impressive naked cake for the pinterest perfect tea party! Learn how to make a delicious tea party cake with this step by step tutorial.

Create a simple yet impressive naked cake for the pinterest perfect tea party! Learn how to make a delicious tea party cake with this step by step tutorial.

Shout out to anyone who is a nanny/full time babysitter. This post is for you…. kinda. A few years ago I left the world of social media and content management to work with kids. It was a total world shift for me and while I’ve been doing some side projects in the digital space I haven’t really looked back. There are days when I’m not sure how my bills will get paid and I long for the days of a regular paycheck, or when one of my kiddos is on their third tantrum of the day because sugar is not a food group but overall, I really enjoy it. There is something magical about it. And if I’m being real here, I think kids are easier than dealing with adults sometimes. Kids’ only ulterior motive is to get out of bedtime or to get an extra cookie. Adults? So much more drama.

MAKE IT: STRAWBERRY CHAMPAGNE CUPCAKES

So 3 years ago, I left the world of “real people jobs” and started nannying and this week, my first little is turning 4! I’m a little teary eyed thinking about it. Okay, so my main goal as kiddos get older is that I end up being the cool Aunt. You know what I’m talking about. The one that they can go to for things they may not be able to tell mom or dad about. The one that is still single and enjoying life and they basically stalk my instagram feed (it’s a thing, I promise). Since I’m not related to the kiddos it’s a bit strange but I absolutely love getting to see them grow up.

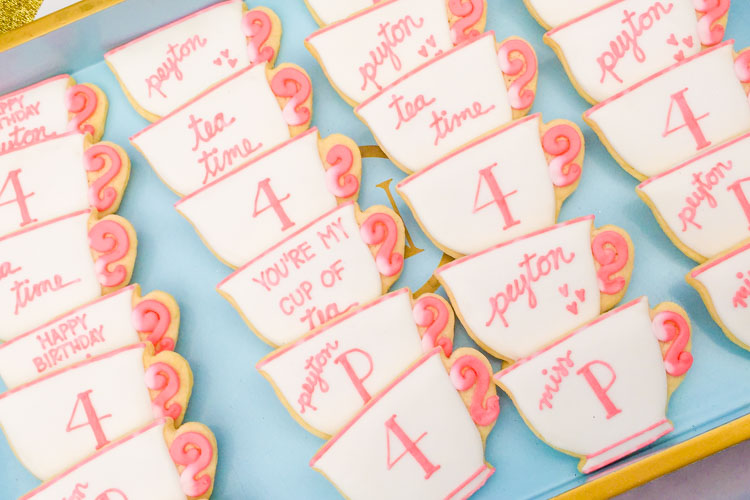
Tea party cookies

So for P’s party her mom is basically amazing and asked me to make the cake for her birthday party. Of course I said yes! The theme was a Royal Tea Party and for real you guys, it was GORGEOUS! I didn’t take a bunch of photos because I’m a dolt and was too busy waving a bubble wand but… I can tell you how I made the Tea Party Cake!!!

A Pinterest Perfect Tea Party Cake

Create a simple yet impressive naked cake for the pinterest perfect tea party! Learn how to make a delicious tea party cake with this step by step tutorial.

Additional Supplies:
6 inch round cake pan
Kitchen Scale
Non Stick cooking spray
Cooling Rack
Serrated knife or cake leveler
Piping bags
Wilton Size 1A icing tip

** Note: The cake is topped with delicious meringue cookies! I got the recipe from ShugarySweets and they turned out beautifully. I recommend making these at least a day in advance (they take a really long time to cook) on a day that has very low humidity.

Don’t forget to PIN for later! 

Create a simple yet impressive naked cake for the pinterest perfect tea party! Learn how to make a delicious tea party cake with this step by step tutorial.

A Pinterest Perfect Tea Party Cake

Ingredients

  • 1 Box White cake mix
  • 2 tbls almond extract
  • 1 cup water
  • 1/2 cup vegetable oil
  • 3 eggs
  • Simple syrup
  • For Frosting:
  • 1 Cup unsalted butter (room temp)
  • 1/2 cup vegetable shortening
  • 2 tsp salt
  • 1 package strawberry Jello
  • 6 cups powdered sugar
  • 3 tbsp whole milk or heavy cream

Instructions

  1. Preheat oven to 350 and spray 6 inch cake round with non-stick cooking spray
  2. On a kitchen scale, weigh the empty mixing bowl. Record this number for later
  3. Mix all ingredients for cake in mixing bowl and weigh. Subtract the bowl weight from this and divide that number by 4 (for four layers) - I could tell you just to evenly distribute the mix, but who keeps 4 6 inch cake rounds on hand!?!
  4. Weigh the cake round zero out your scale. Slowly pour batter in to the cake round until you get to the desired weight (mine was 196g)
  5. Bang your pan on the counter a few times to release any excess bubbles.
  6. Bake for 15 minutes. Repeat for all four layers.
  7. For best decorating, freeze each layer for 1 hour before leveling and an additional hour afterwards for maximum moisture retention.
  8. Level each layer using a cake leveler or serrated knife.
  9. For frosting:
  10. Cream butter and shortening together until smooth.
  11. Add in salt
  12. Slowly add in powdered sugar and mix until fully blended
  13. Add and mix milk until smooth
  14. Add a few tbsp strawberry jello for flavoring until you get to your desired pink color
  15. Let chill for 20 minutes
  16. Assemble the Cake
  17. On a cake round place a few tablespoons of frosting to act as your glue.
  18. Place first layer of cake on the bottom. Leveled side up.
  19. Drizzle with simple syrup.
  20. Using a piping bag and size 1A Wilton icing tip, pipe around top surface of the cake layer. Fill in the middle in a circular pattern.
  21. Place the second layer leveled size up. Repeat frosting process.
  22. Repeat until all 4 layers are assembled and use an offset spatula to smooth out the frosting on top. This should use all of the frosting you just made.
https://www.doityourfreakingself.com/tea-party-cake/


Fall Playlist 2017

on August 23, 2017

Gear up for the season with 14 songs for a fall playlist to set your mood and get ready for your favorite fall activities.

Fall. Is it here? Is it not? All I know is that Starbucks is already stocking Pumpkin Spice Syrup and I’m totally okay with that.

Gear up for the season with 14 songs for a fall playlist to set your mood and get ready for your favorite autumn activities.

As a lot of you know, I’m definitely a person who has to have music to get into the “mood” for basically anything. If I’m cooking, there’s music. If I’m writing, music. If I’m crafting… oh yeah! Usually I try to choose a playlist that goes with whatever I’m doing and as I’ll working on fall content over the next few weeks, I wanted to share my playlist with you. I’m not gonna lie, I went on a total dive down in Spotify land and maybe had a few too many dance parties. Well, there are never too many dance parties so whatever, my room mate and cat just keep looking at me weird.

Continue reading

DIY Mermaid Floppy Hat

on August 16, 2017

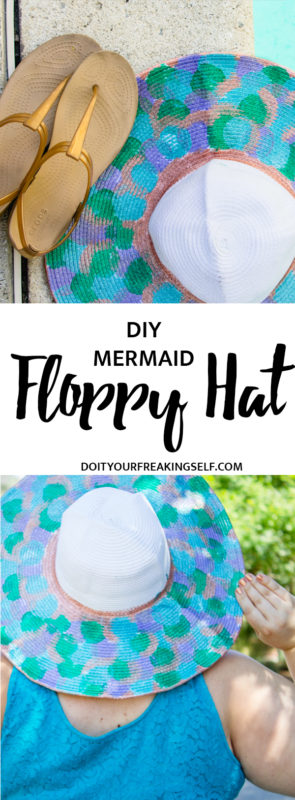
Show off your inner mermaid with a DIY Mermaid floppy hat! DIY your own custom painted floppy sun hat to create the perfect addition to your summer wardrobe.


She just might get you lost,
And she just might leave you torn,
But she just might save your soul
If she gets you any closer….
Rooftops and Invitations 

Dashboard Confessional


This post may contain affiliate links. Shopping from these links helps support this website.

Today’s music selection comes from my current re-discovering of Dashboard Confessional. Do you guys ever go back and listen to a band you liked years ago and realize that you still love them and their songs still hit you in the feels? And it just feels like… coming home. I don’t really know exactly how to quantify it but that’s what it feels like. So, you know… just listen and enjoy.

Show off your inner mermaid with a DIY Mermaid floppy hat! DIY your own custom painted floppy hat to create the perfect addition to your summer wardrobe.

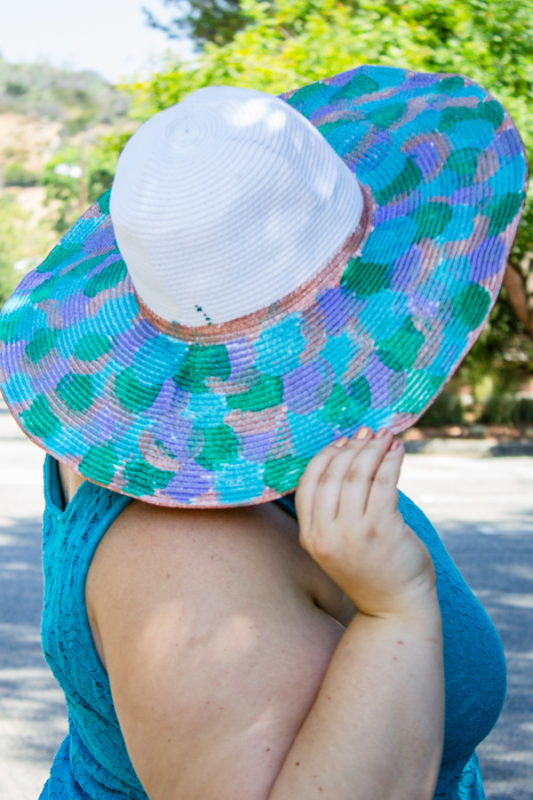
You know all that stuff about being secretly a mermaid? Yep, there’s hats, swimsuits, shirts, necklaces, leggings, pencils… all of it. But lets be real here, if you were a mermaid, wouldn’t you just tell everybody? Just own that shit because ITS AWESOME! But… you know… more like the Daryl Hannah or Peter Pan kinds. Not the Harry Potter ones, those give me nightmares.

MAKE IT: MAGICAL MERMAID BARK

Show off your inner mermaid with a DIY Mermaid floppy hat! DIY your own custom painted floppy hat to create the perfect addition to your summer wardrobe.

Anyway. The moral of the story is be a mermaid. Be magical. Own that shiz and don’t care what anyone else says. Oh! And you know, it doesn’t hurt to have something that looks like a mermaid on to REALLY identify yourself. Like a Mermaid beach floppy hat perhaps?

Aside from Mermaids, the inspiration from this project came from the wonderful Rachel Mae Smith of thecraftedlife.com and Sarah Hearts who hosted a DIY Floppy hat workshop at Craftcation 2017. If you’re a maker, creator, seller, etc. I definitely recommend signing up because it is a truly amazing learning and connecting experience.

DIY Mermaid Floppy Hat

Show off your inner mermaid with a DIY Mermaid floppy hat! DIY your own custom painted floppy hat to create the perfect addition to your summer wardrobe.

Supplies:
Floppy Hat
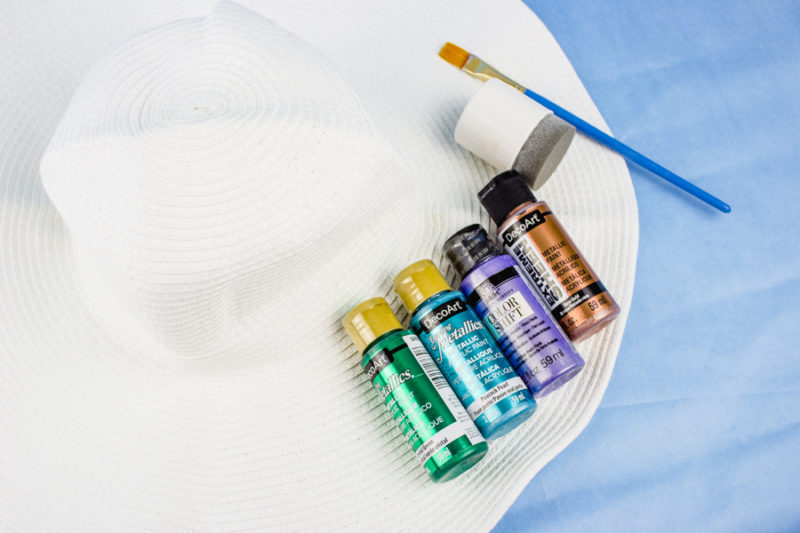
Large Foam Pouncers – These Martha Stewart pouncers are great! Scroll down for an easy hack so you don’t have to buy a million packages of these things.
Medium flat paint brush
FolkArt Color Shift Paint in Purple Flash
Deco Art Dazzling Metallics in Crystal Green and Peacock Pearl
Deco Art Extreem Sheen in Antique Bronze

Cost: $20 or less
Time: 1-2 hours
Waterproof? um… no? maybe? Don’t use it while you swim. It’ll make you swim slower and clumsier, not like the mermaid you are.

MAKE IT: DIY MERMAID TRINKET TRAY

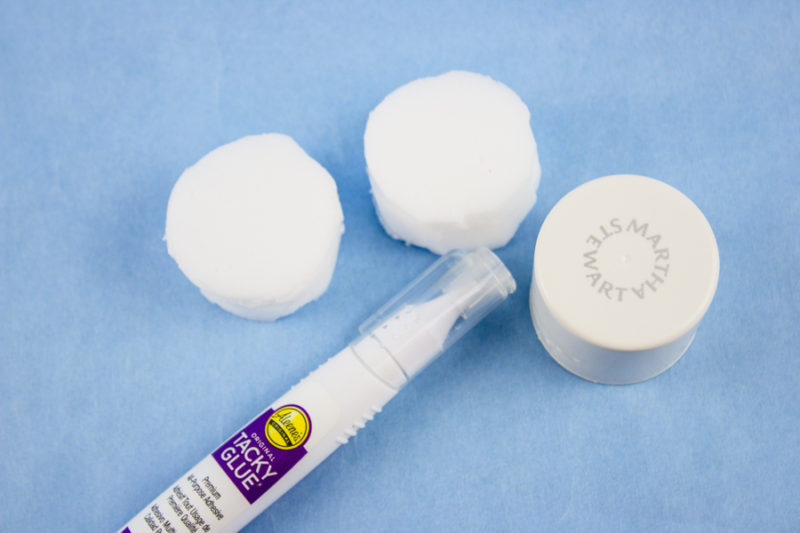
I’m in love with the Martha Stewart pouncers but I really didn’t want to buy more than one package so I hacked them with melamine sponges. To do this, you’ll need some magic eraser sponges – I got mine from the dollar store, a large Martha Stewart foam pouncer and a craft knife.

Easy Martha Stewart foam pouncer refills

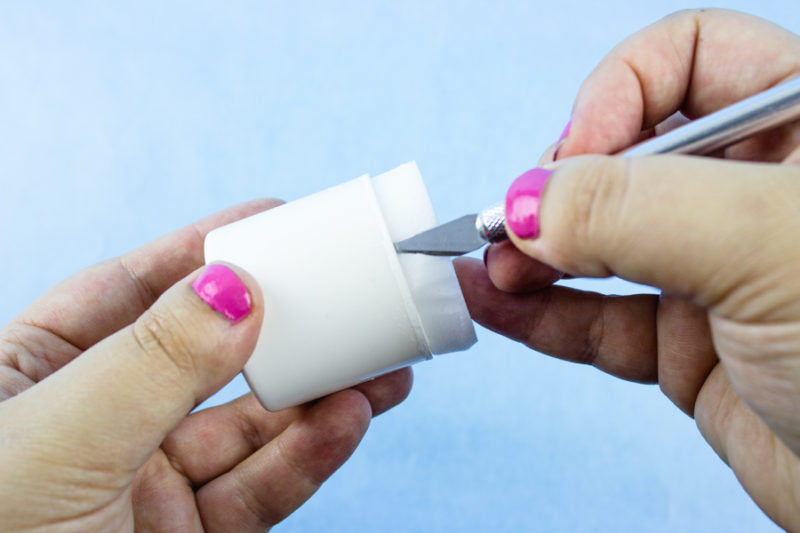
Remove the foam part of the pouncer and use the casing to create 2 circle cut outs from each sponge. Glue them together – on top of each other – and let it sit for about an hour or two to dry. Stick the stacked sponge into the empty pouncer container and use a craft knife to carefully trim away the sides to create a neat circle. Now you’ve got a total of 3 pouncers, one for each color!

Easy Martha Stewart foam pouncer refills

Okay, on to the hat!

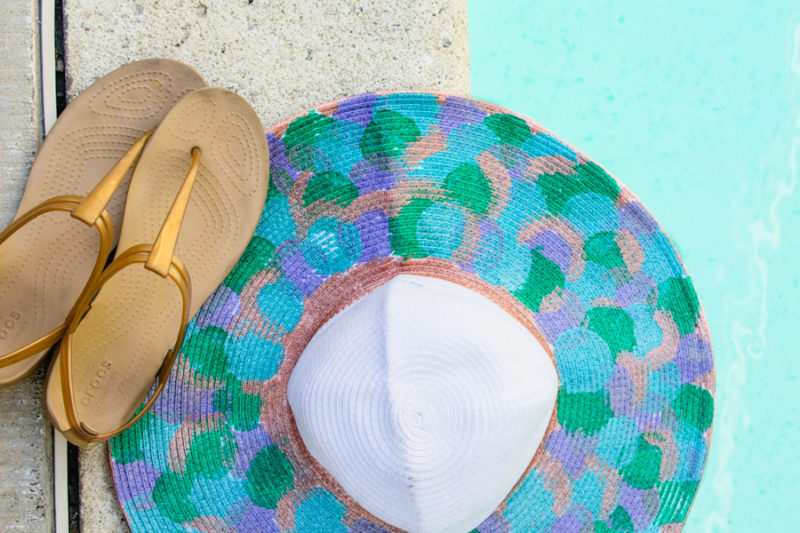
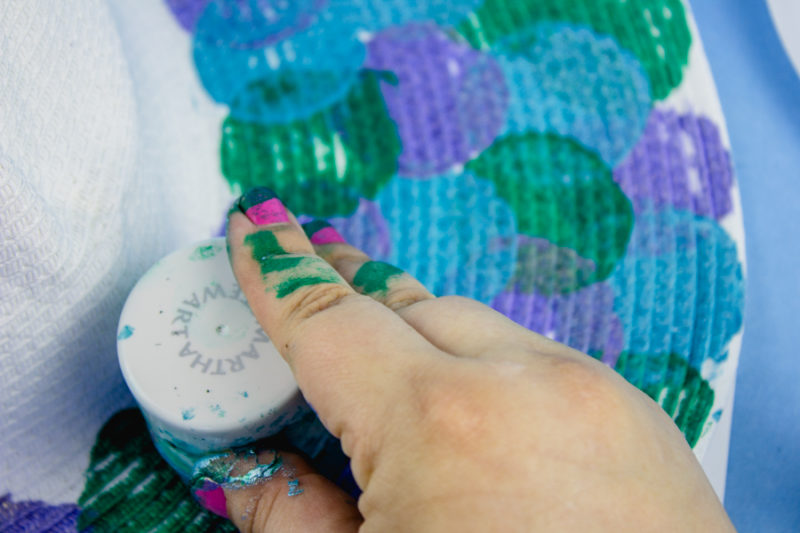
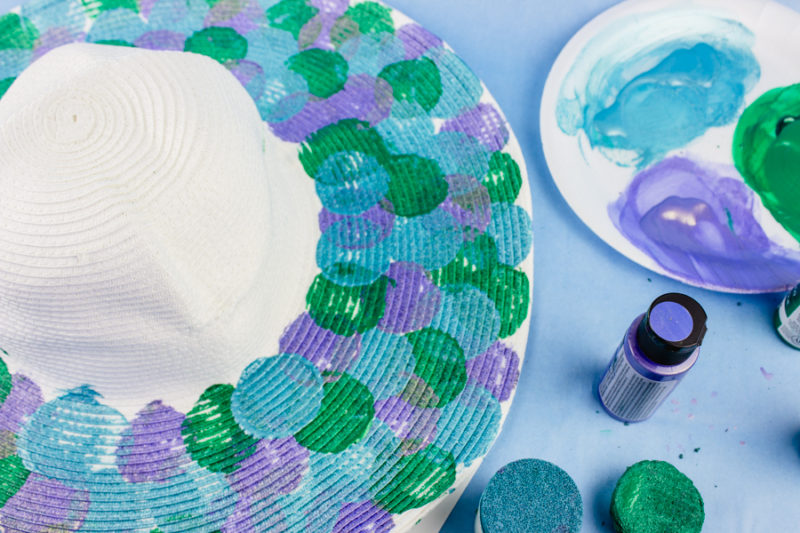
Start by creating a pallette of each color for dipping. I like using the lid of a sour cream container or a paper plate. Stamp in a random pattern around the edge of the hat.

Show off your inner mermaid with a DIY Mermaid floppy hat! DIY your own custom painted floppy hat to create the perfect addition to your summer wardrobe.

Once that’s done, start layering colors in random order around and up until the entire brim is painted. Stop as close as you can to the crown of the hat.

Show off your inner mermaid with a DIY Mermaid floppy hat! DIY your own custom painted floppy hat to create the perfect addition to your summer wardrobe.

Grab a medium to large flat paintbrush to add in some detail with an accent color. For this project, I used metallic bronze. Lightly brush paint around a few of the “scales” and finish by painting a band around the base of the hat to give it a more finished look.

Show off your inner mermaid with a DIY Mermaid floppy hat! DIY your own custom painted floppy hat to create the perfect addition to your summer wardrobe.

Allow it to dry completely and you’re off to show everyone your fancy mermaid self!

Don’t forget to PIN for later!

Show off your inner mermaid with a DIY Mermaid floppy hat! DIY your own custom painted floppy hat to create the perfect addition to your summer wardrobe.

Show off your inner mermaid with a DIY Mermaid floppy hat! DIY your own custom painted floppy hat to create the perfect addition to your summer wardrobe.

SaveSaveSaveSave

SaveSave

SaveSave

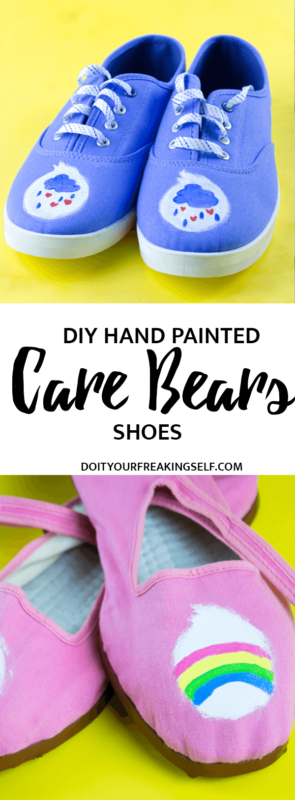
DIY Hand Painted Care Bears Shoes

on August 10, 2017

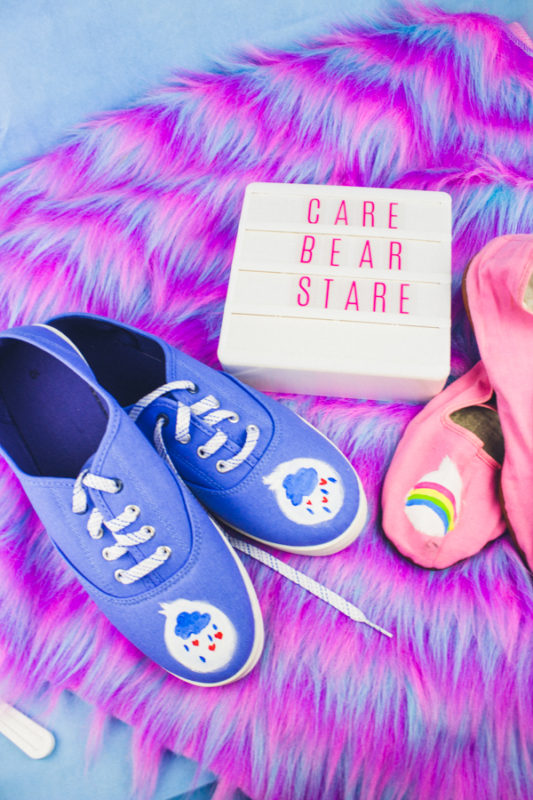
Wish on your inner child with these adorable DIY painted care bears shoes! How cute are these for kids and grown ups!

Oh, uh oh, you’re changing your heart
Oh, uh oh, you know who you are
– 1234, Feist


It’s a Feist kind of day and no one is going to stop me. Instead, listen to her soothing voice as you create! And work! Or take a nap. It’s kinda good for everything!

Wish on your inner child with these adorable DIY painted care bears shoes! How cute are these for kids and grown ups! - Back to school, nostalgia, vintage fashion, diy fashion, diy shoes, hand painted shoes

This post may contain affiliate links. Shopping from these links helps support this website.

Let’s talk about the Care Bears shall we? So… I, along with many of you grew up on them and are probably now introducing the brand to all of your littles. But not the new CGI ones. Those were an abomination and should never be talked about again. I’m talking about the OG, hand drawn Care Bears. My favorite one was Care Bears in Wonderland. I have no idea why, but those were some seriously good times. Scared to admit you’re a Care Bears fan? Feel like others will tell you they’re “too kiddie”? Just own it! Do you really care what someone else is gonna say?

Wish on your inner child with these adorable DIY painted care bears shoes! How cute are these for kids and grown ups! - Back to school, nostalgia, vintage fashion, diy fashion, diy shoes, hand painted shoes

MAKE IT: STAMPED WATERMELON SHOES

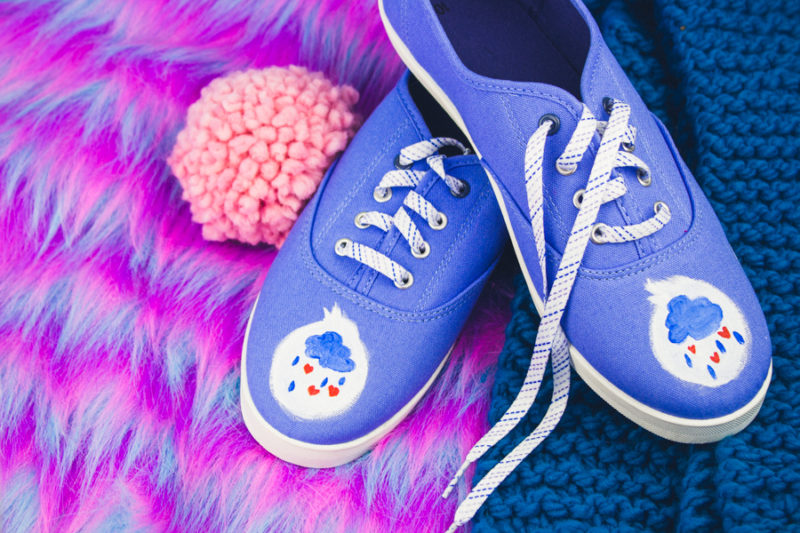
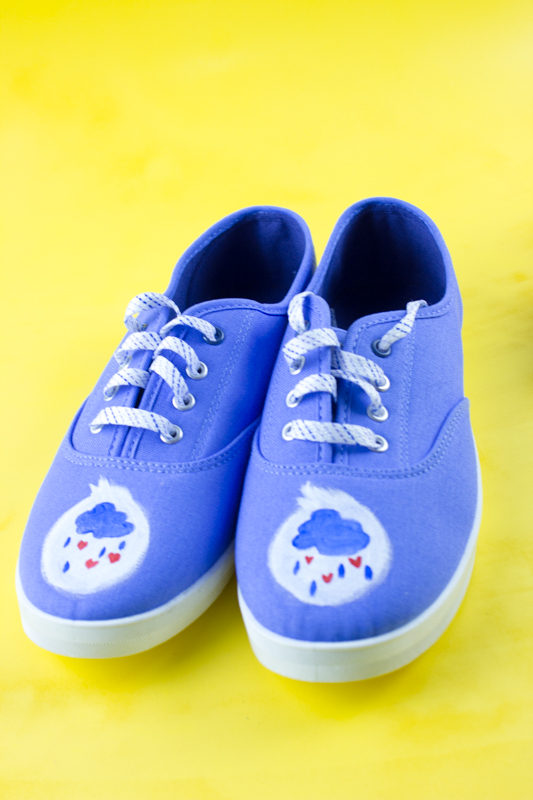
Okay now that we’re feeling all nostalgic, let me introduce you guys to today’s DIY. Yep, you too can have your favorite bear with you wherever you go! For these painted Care Bears shoes I used Grumpy Bear (because even though he was Grumpy, he was still pretty awesome) and Cheer Bear… because… Cheer Bear? And rainbows!

This project was pretty cheap to do, I found the blue shoes at Walmart on sale for $3! $3 you guys! I nearly filled my cart! But I decided against it because I am a responsible adult (sometimes).

DIY Painted Care Bears Shoes

Cost: $15
Time: 1 hour
Nostalgia level: 10!

Supplies:
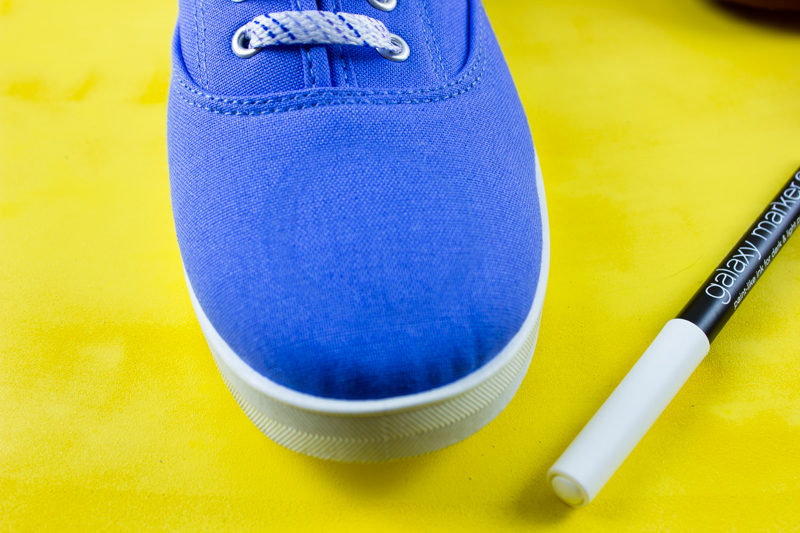
Canvas shoes – really any shoe with a solid toe area
Multi-surface paints in desired colors
Small paint brushes
Iron for heat setting

To begin, gently clean the front of each shoe with water in the area you will be painting. Allow to dry.

Wish on your inner child with these adorable DIY painted care bears shoes! How cute are these for kids and grown ups! - Back to school, nostalgia, vintage fashion, diy fashion, diy shoes, hand painted shoes
Use a white colored pencil or galaxy marker to outline the shape for each Care Bear “tummy”. It’s essentially a circle with a tuft at the top.

MAKE IT: ZELDA PIXEL HEART NECKLACE

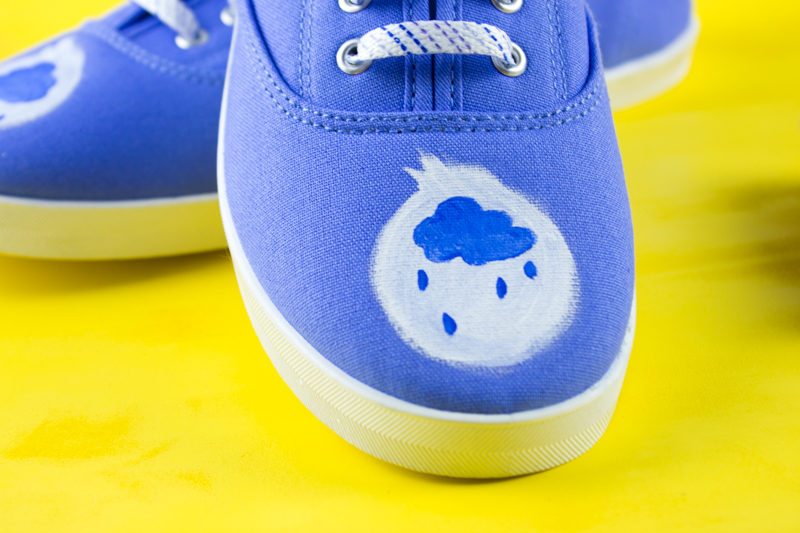
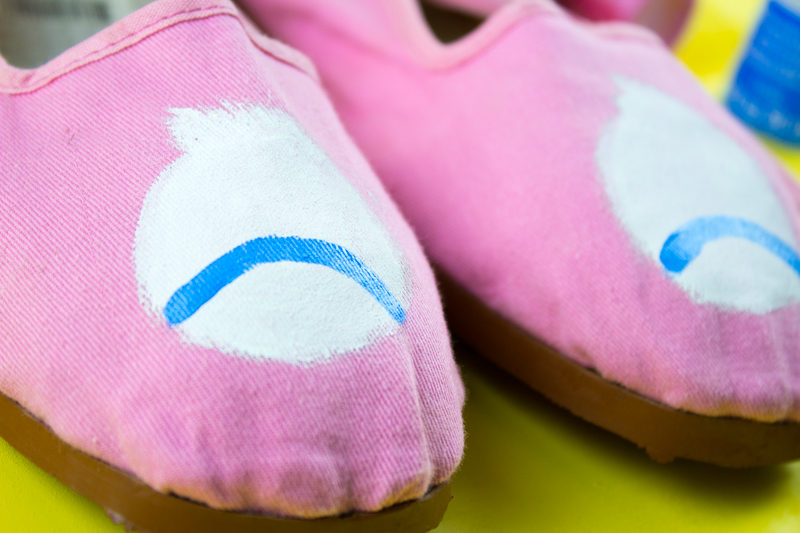
Mix white paint with a bit of fabric medium and fill in each circle with a thin layer of paint. Allow to dry and add one more layer to create an opaque circle.

Wish on your inner child with these adorable DIY painted care bears shoes! How cute are these for kids and grown ups! - Back to school, nostalgia, vintage fashion, diy fashion, diy shoes, hand painted shoes

Once the white layer is dry – give it about 15-20 minutes – go in to paint the design.

For Grumpy Bear:
Paint the cloud first, then the rain drops. Once those are dry, go in with a tiny brush in red to draw “v”s. They come out looking like hearts so there’s less chance of them being too big. You’ll need to draw 3 on each “tummy”
Wish on your inner child with these adorable DIY painted care bears shoes! How cute are these for kids and grown ups! - Back to school, nostalgia, vintage fashion, diy fashion, diy shoes, hand painted shoes

Wish on your inner child with these adorable DIY painted care bears shoes! How cute are these for kids and grown ups! - Back to school, nostalgia, vintage fashion, diy fashion, diy shoes, hand painted shoes

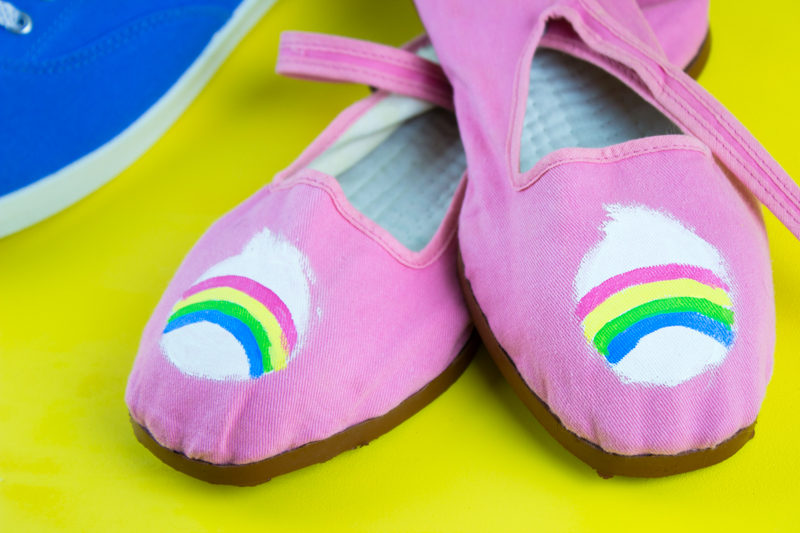
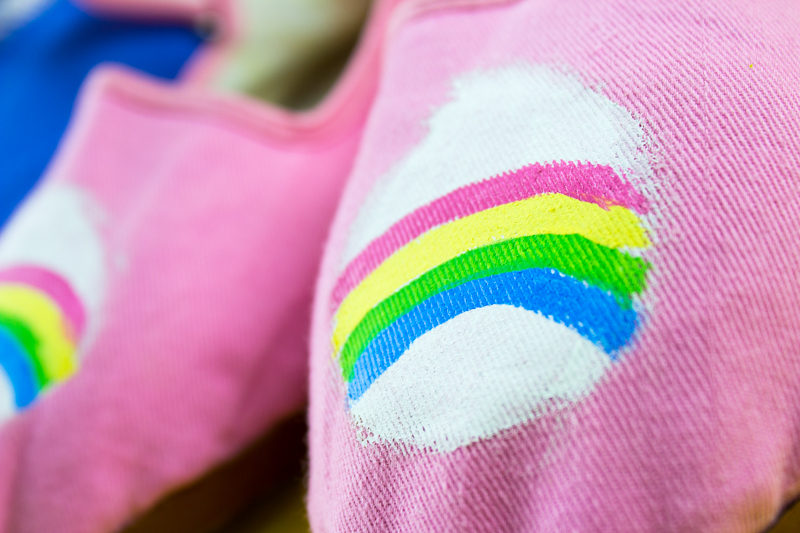
For Cheer Bear:
Start by painting a thin slightly arced stripe of blue about 1/4 inch from the bottom. Allow 5 minutes to dry. Then paint stripes of green, yellow and red (from bottom to top) in the same method.

Wish on your inner child with these adorable DIY painted care bears shoes! How cute are these for kids and grown ups! - Back to school, nostalgia, vintage fashion, diy fashion, diy shoes, hand painted shoes

Wish on your inner child with these adorable DIY painted care bears shoes! How cute are these for kids and grown ups! - Back to school, nostalgia, vintage fashion, diy fashion, diy shoes, hand painted shoes

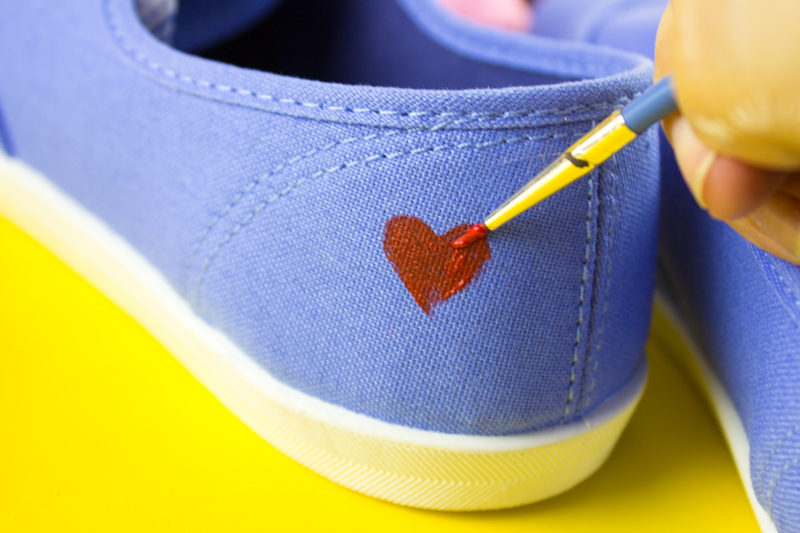
Paint a tiny heart on the outside heel of each shoe (because all Care Bears have those cute heart butt tag things) in red.

Wish on your inner child with these adorable DIY painted care bears shoes! How cute are these for kids and grown ups! - Back to school, nostalgia, vintage fashion, diy fashion, diy shoes, hand painted shoes

Allow to fully cure for 24 hours then use an iron and a piece of scrap fabric to heat set each design.

Wish on your inner child with these adorable DIY painted care bears shoes! How cute are these for kids and grown ups! - Back to school, nostalgia, vintage fashion, diy fashion, diy shoes, hand painted shoes

And well… you’re done! Let your 80’s baby flag fly! You are awesome and if you love it… you should wear it!

PIN FOR LATER:

Wish on your inner child with these adorable DIY painted care bears shoes! How cute are these for kids and grown ups! - Back to school, nostalgia, vintage fashion, diy fashion, diy shoes, hand painted shoes

SaveSave

SaveSave

SaveSave

Sassy Day of the Week Printable Hanger Tags

on July 31, 2017

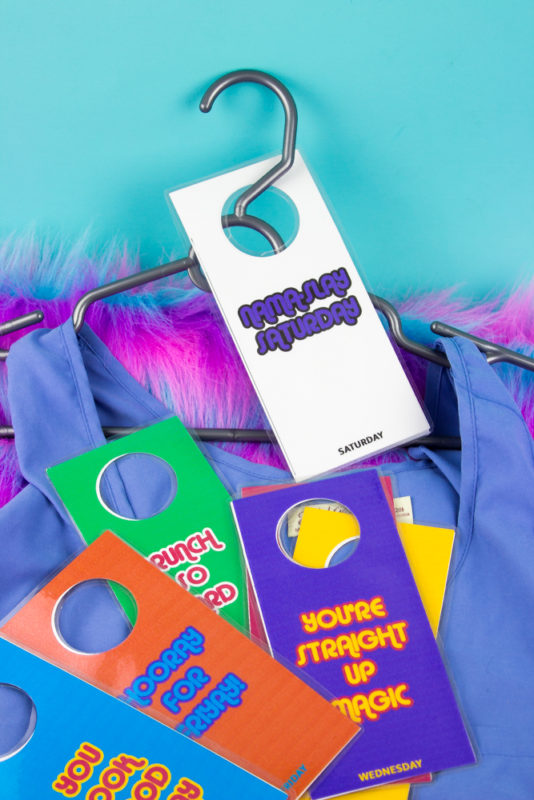
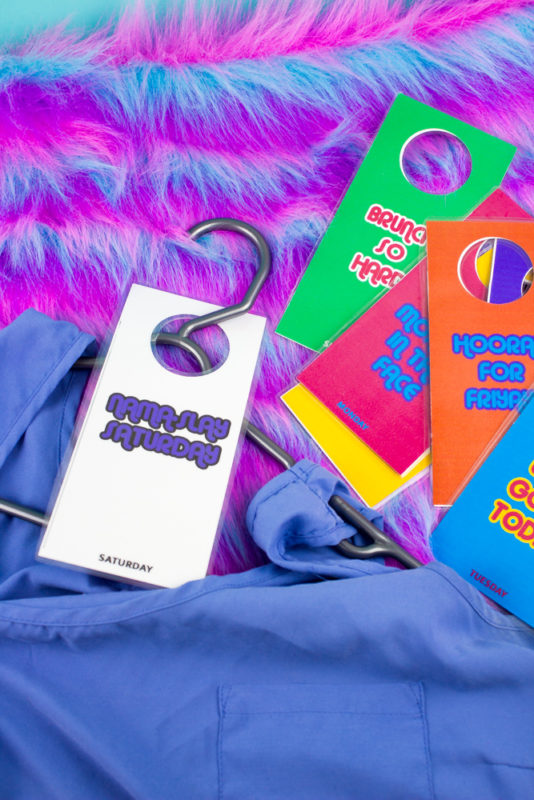
Organize your weekly wardrobe and give yourself a morning boost with some sassy day of the week printable hanger tags!

Don’t buy me a drink, I make my money
Don’t touch my weave, don’t call me “honey”
‘Cause I run my shit, baby

Woman – Ke$ha

Ke$ha’s Woman has been playing on repeat for at least two days. And if you can get past the cursing (there is a lot) it’s a pretty awesome song of really just owning independence. Which is kinda awesome. Also… those horns. Take a listen if you’re down for it, it’s not your typical Ke$ha that’s for sure.

Organize your weekly wardrobe and give yourself a morning boost with some sassy and free printable day of the week hanger tags!

All of that goes to say that this DIY is probably one of my favorite funtional ones I’ve one in a while. I’ve recently realized that I LOVE systems. If you follow my instagram stories, you’ll see me do daily journals and talk about how every Sunday I put stickers in my planner to organize my week. I’m far from the most organized person, but I try where I can. Spending an hour or so to set myself up for success? Totally worth it. And yes. I pick out my clothes for the week on Sundays. It saves me a TON of time trying to figure out what is clean and what I “feel” like wearing. So yes, I treat myself like an elementary school kid sometimes, and you know what? I’m owning that shit with cute hanger tags.

Sassy Day of the Week Printable Hanger Tags

Organize your weekly wardrobe and give yourself a morning boost with some sassy and free printable day of the week hanger tags!

These tags are great because I created them to have a notes section on the back to add little things like which bra and shoes to wear with each outfit! Pretty snazzy heh?

I had a lot of these supplies on hand so they’re relatively inexpensive to create.
Cost: $10 or less
Time: 1 hour
Organization level: 10!

Supplies:
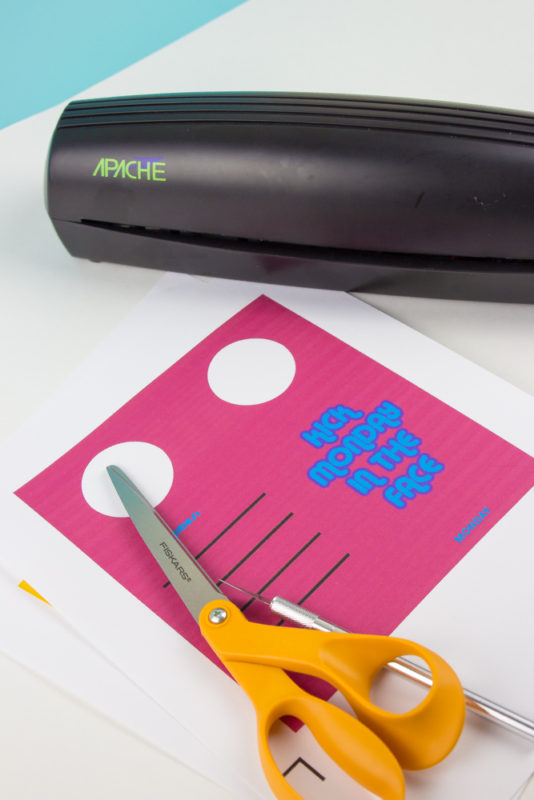
Printables printed on card stock
Cricut/craft cutter or scissors
Glue stick
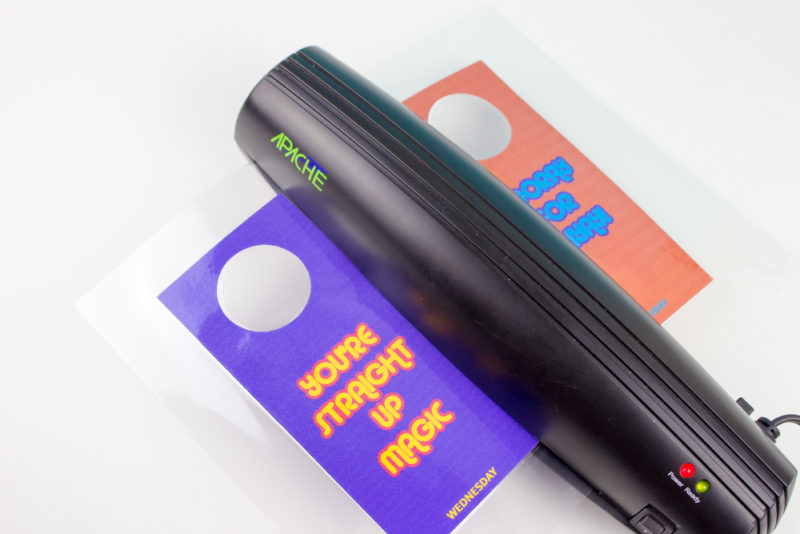
Laminator with laminate sheets
Optional: Dry Erase Marker

Printables:
For Cricut/craft cutter
For Regular print outs

I created these printables to also work with a Cricut craft cutter. I use an Explore Air 2 and I absolutely love it! Just resize them to be 6 inches wide in design space and use the print and cut function.

Organize your weekly wardrobe and give yourself a morning boost with some sassy and free printable day of the week hanger tags!

If you’re not using a cutting machine, simply print each tag template at 100% scale. They’re sized to be 6 inches wide.

Make it: Washi Tape Pencils

Organize your weekly wardrobe and give yourself a morning boost with some sassy and free printable day of the week hanger tags!

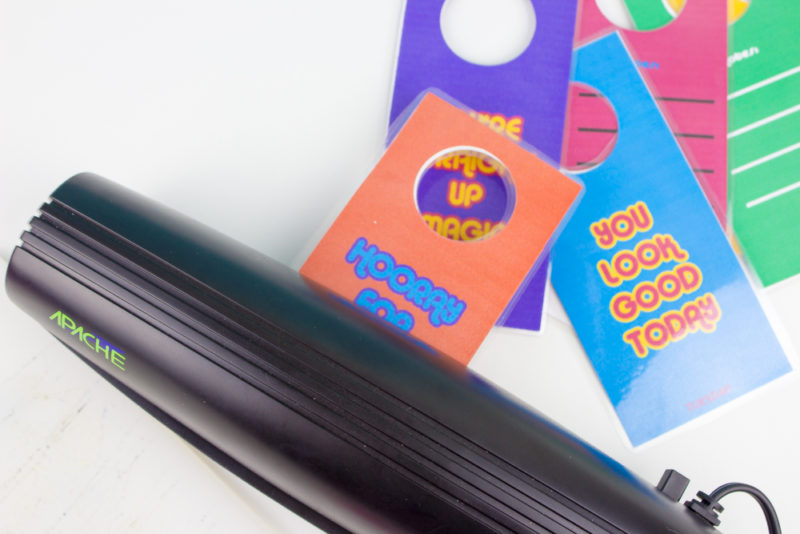
Cut each hanger tag out either with the cricut or using scissors. Glue white sides of each tag together and let dry.

provisions and principles of the U.S. Constitution

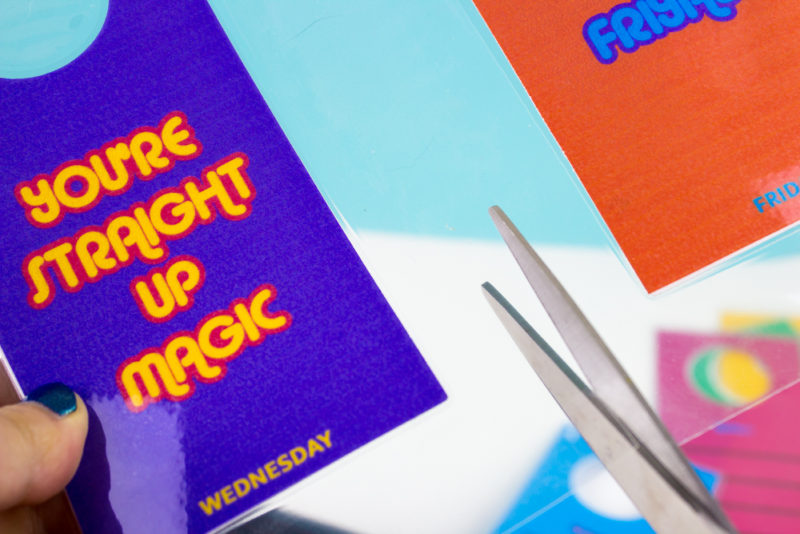
Once the glue is dry on each, run them through the laminator or use the laminator sheets with an iron. I fit 2 per sheet. I ran mine through twice (each direction) to make sure that it was secure.

Organize your weekly wardrobe and give yourself a morning boost with some sassy and free printable day of the week hanger tags!

Organize your weekly wardrobe and give yourself a morning boost with some sassy and free printable day of the week hanger tags!

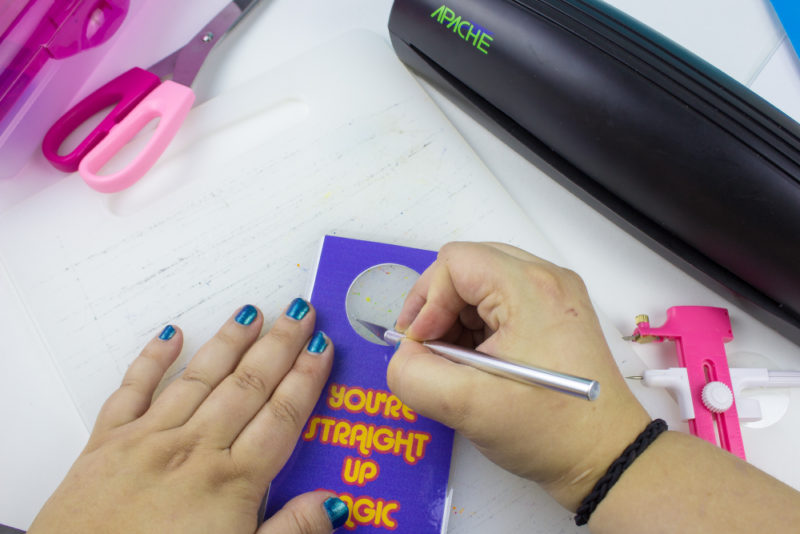
Cut around the edges and center circles making sure not to re-open the laminate. Then run each tag through the laminator a few times again. This might be overkill but as long as it works right?

Organize your weekly wardrobe and give yourself a morning boost with some sassy and free printable day of the week hanger tags!

Make it: DIY Glam Pencil Box

And you’re done! Grab a dry erase marker to write your notes on the back and yet yourself organized woman!

Organize your weekly wardrobe and give yourself a morning boost with some sassy and free printable day of the week hanger tags!

SaveSave

Vicious Perler Bead Shark Cupcake Toppers

on July 24, 2017

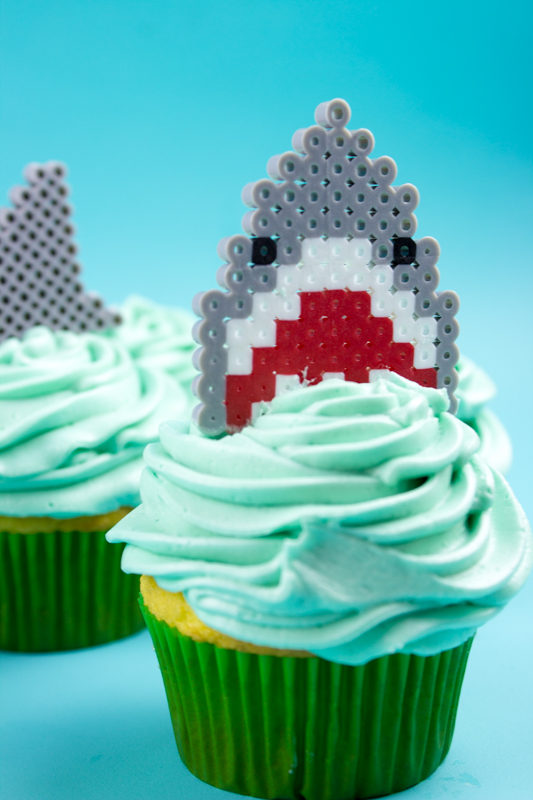
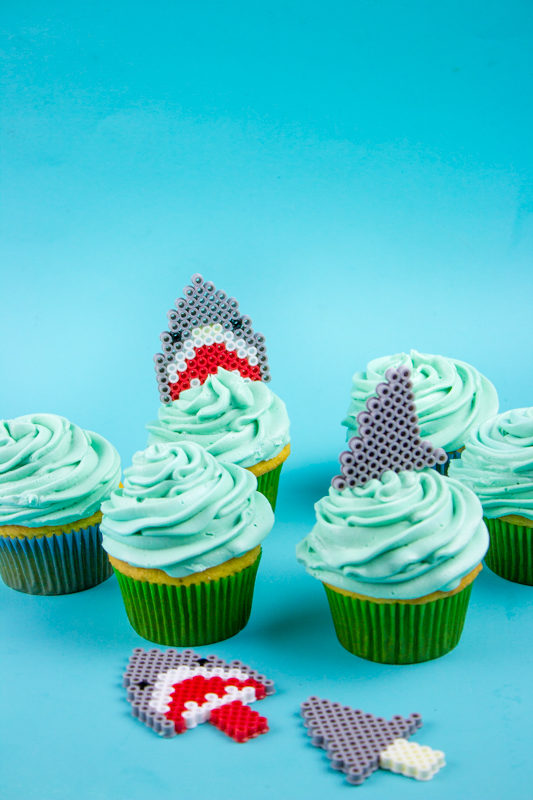
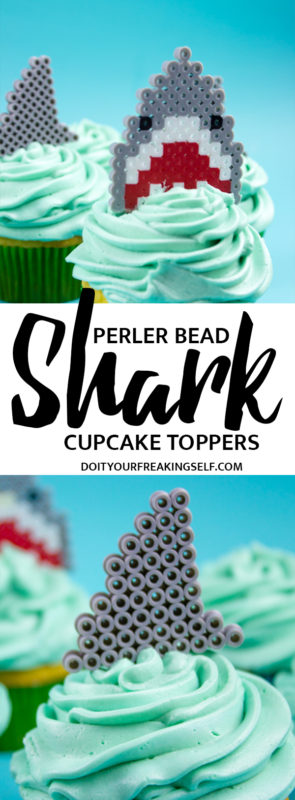
Kick off your Shark Week or Sharknado festivities with some kid friendly Perler Bead Shark Cupcake Toppers! You know you want to!


In the Vegas lights
Where villains spend the weekend
The deep end
We’re swimming with the sharks until we drown

-Vegas Lights, Panic! at the Disco

This post may contain affiliate links. Shopping from these links means that the price stays the same for you but I get a few pennies to keep the coffee pot full and possibly the cat fed.

Before I get into this DIY I wanna talk a little bit about the band mentioned in the lyric above. Do you ever feel weird being a fan of a band that is super huge AGAIN? Like I went to their shows when they opened to Honda Civic Tour for Fall Out Boy (their first tour). I was there through the split up and consequent unknown afterwards. So it’s really strange to me to attend a concert of Panic! at the Disco when a lot of their fans now are younger than I was when they first formed as a band. I’m totally happy for them but it just makes me feel so… old? At what point did I become the parent in the room?!? Anyone else?

Kick off your Shark Week or Sharknado festivities with some kid friendly Perler Bead Shark Cupcake Toppers! You know you want to! 

Okay so Sharks. Can we talk about Sharks? Because I’m really excited that it is Shark Week and also the premiere of Sharknado 5! Yep! There are 5 of them. And I am the first to admit that I have watched and LOVE all of them so far. They are the epitome of cheesy sci-fi and and so out there that it’s hilariously amazing. As for Shark Week… I learn a ridiculous amount without having to be scared out of my wits a la Deep Blue Sea or Jaws (Cheesy, yes I know but imagine watching those when you’re like 12. No more oceans thank you very much!)

Kick off your Shark Week or Sharknado festivities with some kid friendly Perler Bead Shark Cupcake Toppers! You know you want to! 

Okay, so DIY. Yes, that’s why we’re all here. I started these to be earings but they ended up being way to big to put on the side of your head so I had to do some quick thinking and decided that cupcake toppers was the proper solution. I really love this project in particular because I can get some of the older kiddos involved and keep them busy. Perler beads are your BFFs when you work with 6+ year olds!

DIY It: DIY Shark Tshirt Costume

Vicious Perler Bead Shark Cupcake Toppers

Time: 20 minutes or less
Cost: I had everything on hand so free? If not, $15 or less
Awesome level: Vicious.

Kick off your Shark Week or Sharknado festivities with some kid friendly Perler Bead Shark Cupcake Toppers! You know you want to! 

You will need:
Square perler bead peg board
Perler or Hamma beads in Grey, Red, Black and White
Iron
Perler bead ironing paper or parchment paper

Kick off your Shark Week or Sharknado festivities with some kid friendly Perler Bead Shark Cupcake Toppers! You know you want to! 

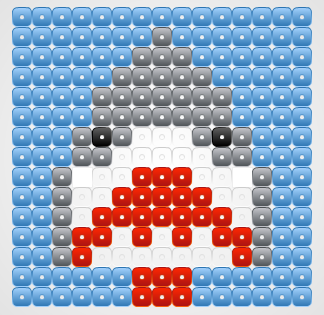
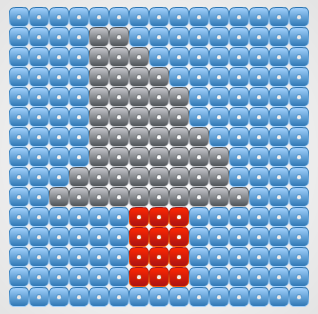
Make sure there are 3 rows of stick on the bottom. I forgot to add those to the pattern! Oops!!

Kick off your Shark Week or Sharknado festivities with some kid friendly Perler Bead Shark Cupcake Toppers! You know you want to! 


These are super easy, as usual. Grab a square peg board and follow the patterns above. Iron as directed and allow them to cool completely before removing them from the peg boards. I found that a large square can hold 2 sharks and 2 fins so keep that in mind if you’re working on a large batch.

Kick off your Shark Week or Sharknado festivities with some kid friendly Perler Bead Shark Cupcake Toppers! You know you want to! 

Stick in your favorite cupcake recipe and get down with your bad self! Depending on how you iron, these can also be washed in the dishwasher – top shelf please!


Kick off your Shark Week or Sharknado festivities with some kid friendly Perler Bead Shark Cupcake Toppers! You know you want to! 

SaveSave

7908931b45bb58060632ba4d10fa313cac59bfd6aaf838390e