
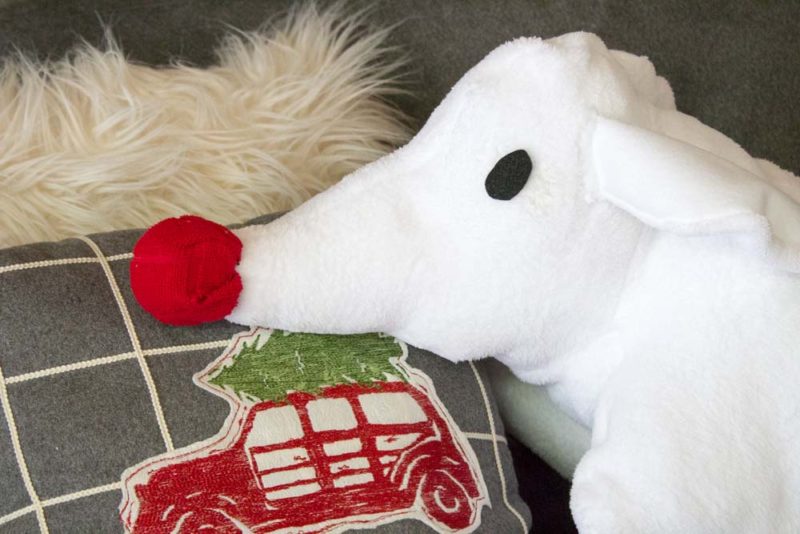
Does anyone else have a pillow that they take everywhere? I do. Well… not a pillow per se, but a pillow pal. Yep. I’ve got one and I have no shame. I have a Stitch Pillow Pet that I take with me any time I have to spend the night somewhere that is not my home and I love it. The kids I babysit do too!

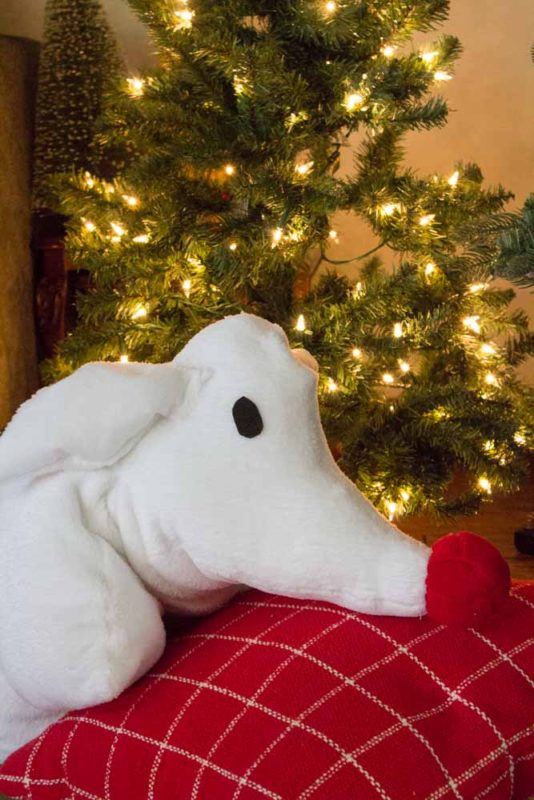
So… when my Nightmare Before Christmas obsessed friend had her housewarming party and casually (but not really) mentioned how Disney had yet to come out with a Nightmare Before Christmas Zero Pillow Pal, the wheels started turning. Using mine as a guide, I made one for her as a christmas present and I gotta say, it turned out pretty awesome.
Do you have a Nightmare Before Christmas/Disney obsessed friend? Is it you? No judgements! Make your own after the jump!
Zero Pillow Pal
Time: Weekend Project
Cost: Under $20
Cozy level: 9
Supplies:
1 Yard White Plush or Fleece
1 Sheet each Red, White, Black felt
E-6000 Glue
Straight Pins
Wide GrossGrain White Ribbon
Needle and Thread
Scissors
Polyfill
This Pattern
1. Print out your pattern
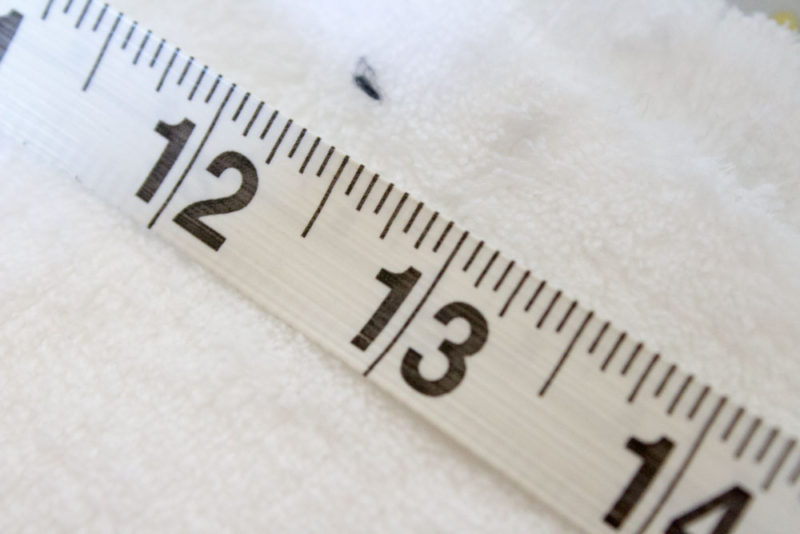
2. Measure and cut a 45×15 inch piece of fabric and set aside (45 is the width of your fabric after unfolding)
3. Cut out pieces of pattern. You should have…. 2 head pieces, 1 bottom head, 2 plush ears, 2 felt ears, 1 nose and 2 eyes.

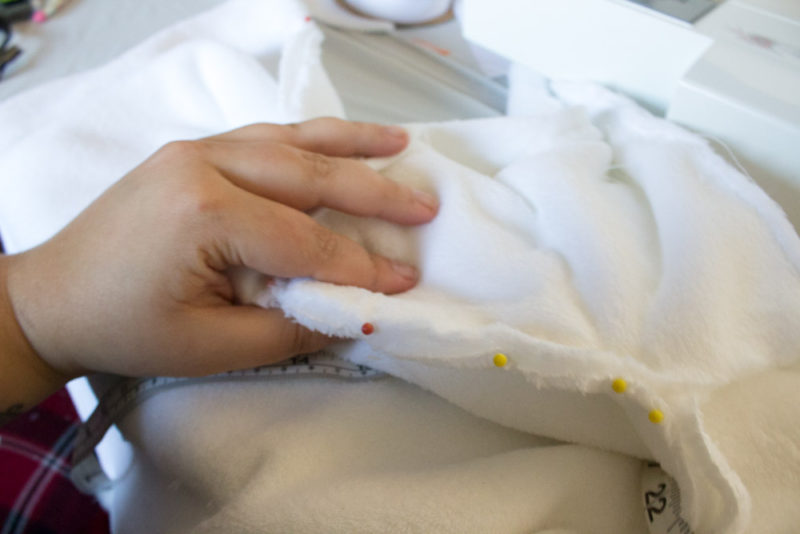
4. Pin the 2 head pieces together and sew the top curved edge. For a more reinforced edge, you can cut a 1 inch strip of felt, fold it over the 2 edges and sew it like a sandwich.
5. Sew on bottom of head piece. Pin in place and sew on. DO NOT TURN RIGHTSIDE OUT. Set aside.
6. Using a needle and thread, sew around the edge of the nose with large stitches. Pull the thread until the edge starts to purse. Insert the nose bulb down into the inside out head piece. Continue stitching around the nose and head to secure. Set aside.
7. Take the rectangle piece you cut in step one and fold in half. Pin and seam the bottom long edge. Seam the side by pinning and stitching 5 inches in from bottom up, then 5 inches in from top down, creating a 3 inch hole.
8. ATTACH THE HEAD This is where it gets kind of crazy so if you get stuck, feel free to comment with your questions. Pin the top of the rectangle like you are going to sew it in a straight seem. Mark the midpoint. (12 inches in). This is where your head is going to be centered. Remove pins 3 inches from each side of mid point.
Pin the top seam of the head to the center point you marked to one side of the fabric and the center of the bottom head piece to the other side like so. Continue to pin around until the head is pinned to the open edge of the pillow piece.
Sew around with the sewing machine and remove pins as you go.
9. Using the 3 inch hole, turn the project right side out.
10. Stuff it like a build a bear! Grab handfulls of polyfill and break apart to it’s fluffy like cotton candy. Use the 3 inch hole and stuff the pillow pal head first. If you have trouble getting the polyfill into the nose and corners, use a pencil or scissors to get the areas. Stuff the head firm and continue to stuff the body. You want the body to be less firm, more cuddly.
11. When you’ve finished stuffing the body, it’s time to attach the ribbon loop to turn the pillow into pal.
Cut a 20 inch piece of ribbon and fold it in half. Insert it into the 3 inch hole about 1 inch in. Fold edges in and pin. Sew hole closed, securing ribbon with the seam.
12. EARS
Sew ear pieces together attaching 1 felt piece to 1 plush piece. Plush is again… kinda hard to work with, so pinning is your friend! Turn right side out.
Fold unfinished edges in and seam. Attach the ears to the head with needle and thread felt side down, toward the back and each side of the head pieces. If you want them to stick out like on mine, you can tack them up by sewing 1 inch up with needle and thread being careful to only stitch the plush side.
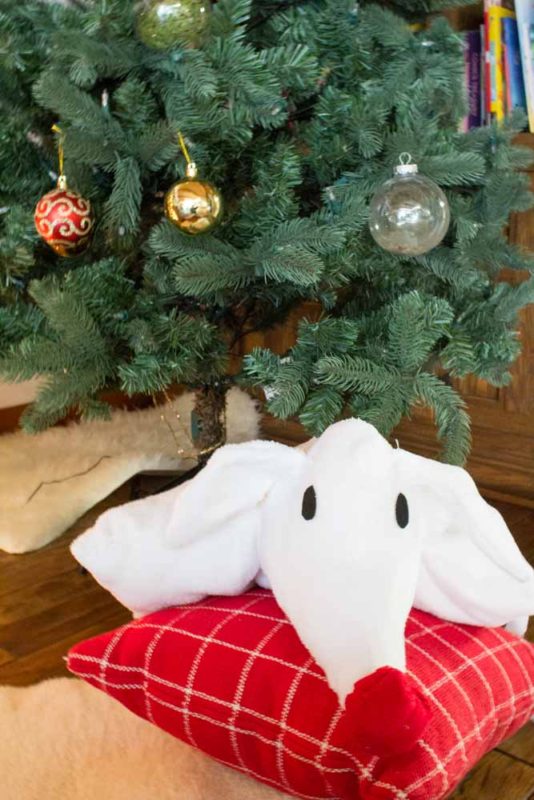
13. Use E-6000 or Fabric Glue to secure eyes to the front/side of the head. Let the glue set for 1 hour. Trim off excess thread and voila! You’re ready for a seasonal adventure!


10 Comments
Cute! I could see my three kiddos fighting over whose pet this is. I’d have to make three of them! Visiting from Inspiration Galore party.
November 27, 2016 at 6:31 amI only have my nanny kids, but I feel your pain. If one gets something, you gotta bring 2 because fights break out and apparently sharing is not an option when it comes to stuff Chelsea brings over!
November 28, 2016 at 8:57 pmThis is absolutely adorable! I have gotta make something like this for my 3-year-old nephew 🙂 Thanks for linking up at the Family joy blog link up party! xoxo
November 28, 2016 at 9:27 pmShamira
Wow! This is awesome! I haven’t seen this movie in FOREVER and it’s the perfect time of year to do it! Thanks for the great project. I wonder how long it would stay white in my house!!!
December 1, 2016 at 8:06 pmThat looks amazing! I have a little friend who is totally obsessed! 🙂 I think I am not crafty enough to make it but maybe her mom….
December 3, 2016 at 7:22 amGlad you like it!
December 3, 2016 at 1:04 pmThis is such a cute project. The reindeer is adorable.
Thank you for sharing this with us on the #HomeMattersParty.
December 5, 2016 at 6:15 pm[…] DIY Nightmare Before Christmas Zero Pillow Pal, by Do It Your Freaking Self […]
December 6, 2016 at 5:30 pmWow, you are so creative, this is a great DIY pillow pet pal especially for the holidays. Thanks for linking up at the #HomeMattersParty – Hope to see you back again this Friday!
December 6, 2016 at 5:45 pmThanks! I love linking up with you guys!
December 7, 2016 at 10:25 am