Browsing Category:

Crafts

How to make Giant Yarn out of Fleece!

on April 5, 2018

Learn how to make your own giant yarn for extreme knitting and chunky blankets! Super easy and so much cheaper that purchasing wool roving!

For the last 2 years I’ve been obsessed with the giant knit blankets you see all over instagram. ALL OVER! You’ve seen them. They look like this.

And yes, I spent many hours looking at how to make one myself and I came to a few conclusions.

1. My arms are too wide to do arm knitting that looks half way decent.
2. Wool roving is expensive no matter how you find to buy it.
3. Buying one of these things is still ridiculously expensive.
4. Roving is not a great thing to make a knit blanket out of. It sheds and is delicate and you can’t wash it. And I have a cat that likes to make biscuits. Thats all that needs said there.

And while I’m sure there are a ton of other yarns out there to achieve the look, I decided to make my own.

Learn how to make your own giant yarn for extreme knitting and chunky blankets! Super easy and so much cheaper that purchasing wool roving! 

In this tutorial you’ll learn to make your own giant yarn using strips of fleece for any number of projects!

How to make Giant Yarn out of Fleece!

Time: 2-3 hours
Cost: $40 – I got the fleece on sale!
Suggested viewing: A Series of Unforntunate Events (The Series)

Supplies:
7-8 Yards of a solid color fleece
Fabric scissors or Rotary cutter
Self healing mat
Ruler
Your hands!

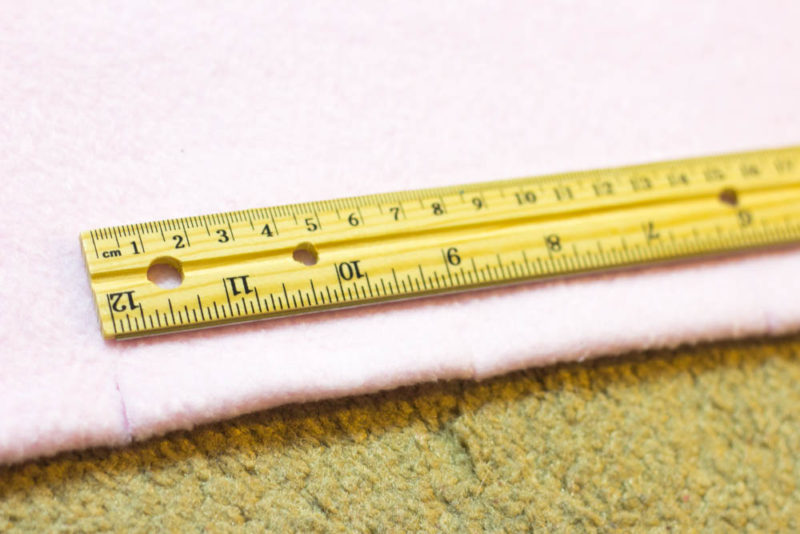
To begin, lay out your fabric (or as much as you can). Keep it folded like it came off the bolt. We’re going to work in 3 feet sections. Place your ruler to the folded side and start cutting 3 inch strips, leaving about 2 inches uncut on the edges of the unfolded side. – NOTE: Depending on what you’re going to use this for, you may want to use 2 inch strips instead of 3. I used 3 inches for a blanket, but 2 inches for anything having to do with giant needles (Size 50 or 70)

Just a quick side note…. maybe don’t do this if you have cats in your immediate vicinity. Or maybe Grampa the Cat is just a butthead. She basically decided all of fleece was hers to play with and hide under… but only while I was trying to cut it. Here is a cute photo for proof.

Learn how to make your own giant yarn for extreme knitting and chunky blankets! Super easy and so much cheaper that purchasing wool roving! 

The easiest way I found to do this was to cut mark my measured out 3 inches, then go back and cut the rest of the strip. Just remember to leave those last 2 inches. This is VERY important.

Learn how to make your own giant yarn for extreme knitting and chunky blankets! Super easy and so much cheaper that purchasing wool roving! 

Learn how to make your own giant yarn for extreme knitting and chunky blankets! Super easy and so much cheaper that purchasing wool roving! 

Once you’ve cut your section strips, its time to make the yarn.

This is where it gets weird so I’m gonna walk you through it.
On the TOP layer, first strip – cut all the way to the edge. Pull the strip to the side.

Learn how to make your own giant yarn for extreme knitting and chunky blankets! Super easy and so much cheaper that purchasing wool roving! 

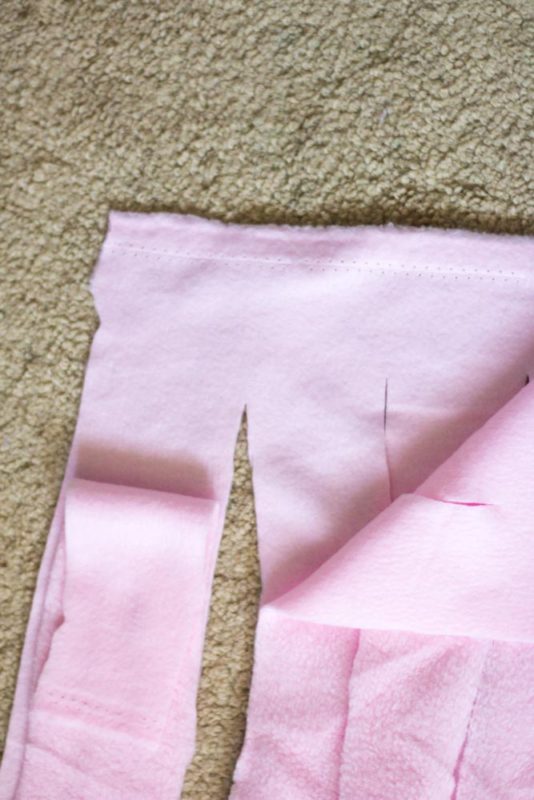
Now, on the BOTTOM layer – First strip – DO NOT cut on the first cut, but the second, so you’ll have a bit of a U shape. Trim and round the outside edges of this “Turn” and set aside.

Learn how to make your own giant yarn for extreme knitting and chunky blankets! Super easy and so much cheaper that purchasing wool roving! 

Do the same technique for the next line of your TOP layer that you just did for the BOTTOM layer. Trim around the outside edges.

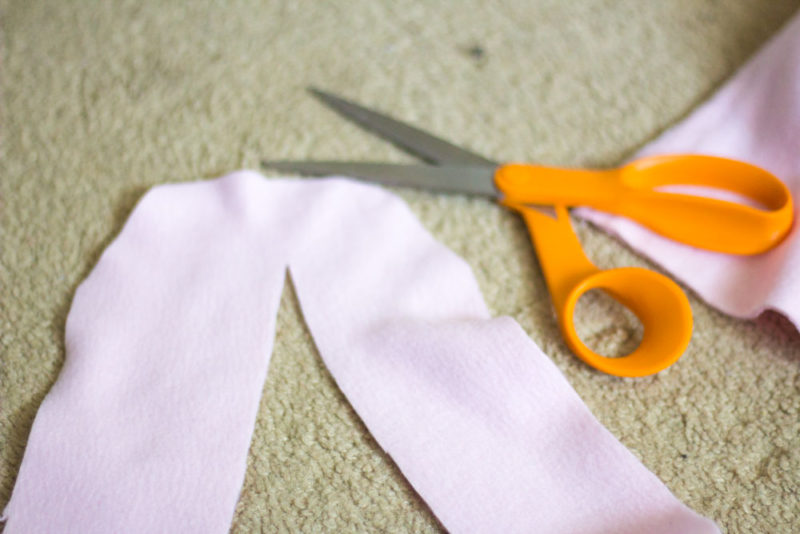
You’ll notice that you’re making one long continuous strip of fabric. Keep going! As your yarn gets longer you can start to roll it into a ball.

Learn how to make your own giant yarn for extreme knitting and chunky blankets! Super easy and so much cheaper that purchasing wool roving! 

Once you’ve finished with one section, keep the strip attached to the next section and lay out another section of fabric. Repeat the method above until you’ve finished all of the fabric. You should have a GIANT ball of yarn. You can also do this in two balls and use your needle and thread to attach the ends of both strips.

Knit Blanket from SaintWools on Easy

Ready to make something out of it?

Wizarding World of Harry Potter Easter Eggs

on March 13, 2018

Create fun Wizarding World of Harry Potter Easter Eggs this spring! Make Hogwarts House eggs or Weasleys Wizard Wheezes inspired Eggs!

I feel like I’ve been in a whirlwind of work and school and podcast launching for the last 2 months and I finally feel like I have some breathing room. One thing that has kept me partially sane is my mini trips to the Wizarding World of Harry Potter at Universal Studios Hollywood…. and wine. Lots of wine.

Create fun Wizarding World of Harry Potter Easter Eggs this spring! Make Hogwarts House eggs or Weasleys Wizard Wheezes inspired Eggs!

MAKE IT: Magical and Delicious Boozy Butterbeer Cupcakes (that might get you drunk)

Universal Studios is about half way between one of my jobs and with my season pass, I sometimes like to stop on the way home and wander through the cobble stone streets of Hogsmeade drinking a butterbeer and eating fish and chips. And… possibly work on Chemistry homework. IT NEVER ENDS!!!

So of course, when I finally had time to make some Easter Eggs, I only had one thing on my mind and for real… I’m a bit in love with these Harry Potter Easter Eggs. Aaaaand I’m kinda craving one of Mrs. Weasley’s chocolate eggs (even though she was super mean and gave Hermione a smaller egg in the 4th book).

Create fun Wizarding World of Harry Potter Easter Eggs this spring! Make Hogwarts House eggs or Weasleys Wizard Wheezes inspired Eggs!

Okay, so these Harry Potter easter eggs are two fold. I did the traditional Hogwarts House eggs with the house crests and the Hogwarts Crest and then I did some Weasley’s Wizard Wheezes inspired ones. The graphics and iconography for their shop is absolutely amazing and Fred and George were GENIUSES!!!

Wizarding World of Harry Potter Easter Eggs

Time: 1-2 hours plus dry time
Cost: $5 or less – I had everything on hand except the eggs
Suggested Listening: Harry Potter and the Order of the Phoenix Film Score – duh!

Continue reading

Beginner Knit Gradient Cowl Scarf

on February 14, 2018

Knit with straight needles, this knit gradient cowl scarf is perfect for beginner knitters learning new stitches. Grab your favorite yarn and get knitting!

Grab your size 10’s! We’re making a cowl!

When I was taking my latest sorting test on Pottermore (Hufflepuff btw – FINALLY) I was asked if I prefer cold or hot weather… and of course I chose cold because I love nothing more than to burrow under my blankets with Grampa the Cat and read a good book or just sleep. If I have to venture out? You can bet I am also bundling up.

Knit with straight needles, this knit gradient cowl scarf is perfect for beginner knitters learning new stitches. Grab your favorite yarn and get knitting!

One of my favorite things to wear and make during the winter season are cowls. They’re like scarves but they just live around your neck so you don’t have to worry about the ends of your scarf being at the wrong angle or whatever. You don’t have to worry about it falling off or getting in the way. Really, I love making scarves but I love it when they’re no fuss. So… yeah, I live by the love of the cowl.

MAKE IT: How to Knit a Beanie on Straight Needles

This particular cowl is ridiculously easy to make even for beginners. Really though, the yarn is the star. It’s what gives it that beautiful pink and purple gradient. You can use any yarn you’d like but for this particular pattern you’re going to want a self striping yarn, or a gradient yarn.

Beginner Knit Gradient Cowl Scarf

Time: Weekend Project
Cost: $10 or less
Suggested tunes: Brian Fallon – SleepWalkers


Knit with straight needles, this knit gradient cowl scarf is perfect for beginner knitters learning new stitches. Grab your favorite yarn and get knitting!

KNIT FLAT

Cast on 100 stitches
Row 1-2 Knit
Row 3-4 Purl
Repeat rows 1-4 until you finish your skien.
The second row of each set makes your pattern.

Knit with straight needles, this knit gradient cowl scarf is perfect for beginner knitters learning new stitches. Grab your favorite yarn and get knitting!

Lay the piece flat flip one side of the work over, forming a twist in the middle. Use the yarn needle and stitch the ends together.

MAKE IT: DIY an Infinity Loom Knit Scarf

Knit with straight needles, this knit gradient cowl scarf is perfect for beginner knitters learning new stitches. Grab your favorite yarn and get knitting!

And you’re done! Super easy right! Pair with your favorite hot cocoa and winter jacket or a light flannel for those mild windy days!

Knit with straight needles, this knit gradient cowl scarf is perfect for beginner knitters learning new stitches. Grab your favorite yarn and get knitting!

SaveSaveSaveSaveSaveSave

Edible Glitter Valentines Pops

on February 9, 2018

Sweeten up your Galentines or Valentines gifts with these bright Edible Glitter Valentines Pops! Add a candy flavor for even more variety!

Sweeten up your Galentines or Valentines gifts with these bright Edible Glitter Valentines Pops! Add a candy flavor for even more variety! | Do It Your Freaking Self | #Chocolate #lollipops #edibleGlitter #Valentines

3 Things I do on Valentines Day

  1. I buy my room mate a giant bag of candy and a flower – even though she won’t eat the candy and gets mad at me that I got her something.
  2. I still buy valentines cards for my nanny kids
  3. I wait until the day after to buy ALL THE CHOCOLATE

I’m sure theres more but thats the general census of my life on Valentines day – during the whole season really. I used to hate it because I was single and had no one – until I stopped caring. I love the hearts and the pink and purple, and cute things…. so I just grew to accept that Valentines meant something different to me than the typical lovey dovey stuff. And I’m cool with that. I freaking LOVE it!

Sweeten up your Galentines or Valentines gifts with these bright Edible Glitter Valentines Pops! Add a candy flavor for even more variety! | Do It Your Freaking Self | #Chocolate #lollipops #edibleGlitter #Valentines

This year, I wanted to make some fun Edible Glitter Valentines Pops for my valentines. They’re super easy and super customizeable so lets get going!

Edible Glitter Valentines Pops

Cost: $15 or less – makes a ton!
Time: 1 hour including cooling time

Continue reading

DIY Valentines Ornament Wreath

on February 1, 2018

Use your left over Christmas ornaments to make this gorgeous DIY Valentines Ornament Wreath! Stay festive!

Use your left over Christmas ornaments to make this gorgeous DIY Valentines Ornament Wreath! Stay festive!  | #valentines #valentinesdecor #homedecor #diywreath | Do It Your Freaking Self

Yep you guys, I went there. So, here’s the deal. I was not in the best of places mentally in December so I missed out on a lot of the crafting that I would probably have been doing. Add all of that to the idea that I made all of my Christmas presents and stuff for my home just didn’t get done.

On the plus side, I finally got my own Christmas tree, so that’s good right!?!

So, saw these ornament wreaths all over this holiday and I’ve always wanted to make one but never did for 2 reasons. 1 – I had like no time during the holidays and 2. Ornaments are not cheap yo!

Use your left over Christmas ornaments to make this gorgeous DIY Valentines Ornament Wreath! Stay festive!  | #valentines #valentinesdecor #homedecor #diywreath | Do It Your Freaking Self

Solution? Make a Heart Wreath during valentines with ornaments that I got on discount! I gotta say, I’m super stoked about this thing and was so excited to put it on our door as soon as it was finished.

DIY Valentines Ornament Wreath

Cost: $15 depending on what you have on hand
Time: 2 Hours or less
Crafty level: 10! but can totally be a beginner craft

Continue reading

DIY Conversation Hearts Sleep Mask

on January 23, 2018

Whether you’re celebrating Valentines or Galentines this DIY Conversation Hearts Sleep mask is a perfect DIY addition to any sleep over!

In case you guys weren’t aware – because I’m really bad at life updates – I went back to school. It’s only one class right now, but that on top of a crazy work schedule means that I am adulting like crazy over here.

Whether you're celebrating Valentines or Galentines this DIY Conversation Hearts Sleep mask is a perfect DIY addition to any sleep over! | Do It Your Freaking Self | #Galentines #Conversation Hearts #Valentines #adultcrafts

Okay, so last year for my birthday I ordered a TON of sleep masks for a make and take craft. Needless to say I had a bunch left over and I’ve been trying to think of a fun thing to do with them. As it is Valentines (or Galentines) season, what better way to use them than with this DIY Conversation Hearts Sleep Mask. As I was making them, I envisioned myself having a sleep over where we all made these. Alas, as I’m adulting and working and going to class all the time, that is not happening, but a girl can dream right!

DIY Conversation Hearts Sleep Mask

Whether you're celebrating Valentines or Galentines this DIY Conversation Hearts Sleep mask is a perfect DIY addition to any sleep over! | Do It Your Freaking Self | #Galentines #Conversation Hearts #Valentines #adultcrafts

Time: 15 min to 1 hour
Cost: $5 or less
Cuteness level: A solid 8

Continue reading

DIY Hand Sanitizer Spray and colorful labels!

on January 16, 2018

Keep germs away with this DIY Hand Sanitizer Spray and these fun colorful labels! Use your favorite essential oils for a fun seasonal gift!

Keep germs away with this DIY Hand Sanitizer Spray and these fun colorful labels! Use your favorite essential oils for a fun seasonal gift! | Do It Your Freaking Self | #DIYHandSanitizer #wellness #essentialOils

Okay ya’ll, tis the season as they say… for germs and colds and all the germs. So, you know… wash your hands, catch your cough in your elbow, take some zinc. BUT if you’re like me, washing your hands may be a little harder to do when you’re wrangling kids who are also sneezing and all that grossness. My solution? I carry DIY Hand Sanitizer Spray with me everywhere. I taught the kids how to use it too!

MAKE IT: Mix Up an Easy DIY Sugar Scrub

I learned how to make this at Craftcation from the lovely Joan Godspeed from Break N Remake – Go check out her YouTube for some seriously awesome sustainable DIYS! – And I wanted to add a bit of Do It Your Freaking Self to it, so I created these ridiculously sassy labels to adhere to the bottles. Wanna make your own? Let’s get started!

DIY Hand Sanitizer Spray

Time: 30 Minutes or less
Cost: $10 or less depending on what you have on hand
Usage: No germs for you!!!

Continue reading

Crochet Cactus Hat Pattern

on January 9, 2018

Whether you’re a plant lady waiting to happen, or just have a deep love of all things cactus, this Crochet Cactus Hat Pattern is enough to make you swoon without getting prickly! A great project for intermediate crochet-ers.

My family has this tradition… or I have this tradition with my family… who knows. BUT ever since I learned to knit and crochet I make one hat a year that is usually inspired by food. And my mom keeps and wears those hats all year long. At one point there was a watermelon hat that made the rounds and we have photos of everyone including the hosted exchange students wearing it over the holidays. I know!!! Recipe for lice, am I right?!? But don’t worry, it gets washed and weirdly enough there has never been a lice outbreak at our house so knock on wood or whatever.

Whether you're a plant lady waiting to happen, or just have a deep love of all things cactus, this Crochet Cactus Hat Pattern is enough to make you swoon without getting prickly! | Do It Your Freaking Self | #CrochetHat #freePattern #cactusHat

This year, since I’ve been living in California for a while, I decided to make a cactus hat and I gotta say… it turned out pretty nice! My sister has claimed it so look out Nashville! This is also the first hat that I’ve crochet. What I mean by that is that I usually knit my hats so this ribbed stitch was super new for me. If you’re a little nervous, don’t be. There’s a bit of a learning curve, but once you learn it, you’ll be making ribbed hats all over the place!

Crochet Cactus Hat Pattern

Cost: $10 or less
Time: Weekend project
Comfort level: Prickly (not really but it was too good to not post!)

Continue reading

California Donut Magnets

on January 2, 2018

Learn how to transform basic letter magnets into fun DIY Donut Magnets inspired by California Donuts with this easy tutorial!

Soundtrack: Jimmy Eat World – Damage

I don’t know about you guys, but using donuts to spell out practically anything makes me super happy. I’ve been in love with all of the instagram shots of California Donuts spelling out “Congrats” for parties and things. And while I’m still a cupcake girl, I definitely love delicious donuts. So I figured… why not create my own magnets?

California Donut Magnets - Do It Your Freaking Self | #LetterMagnets #CaliforniaDonuts #kidscrafts| Letter Magnet Idea | #Magnet

California Donut Magnets

Time: 2 hours + dry time
Cost: $10 or less
Fun level: SWEET

Continue reading

Sassy Christmas Clutch with Cricut

on December 11, 2017

Show your holiday spirit or lack thereof with a sassy christmas clutch with Cricut! These are my favorite gifts to make and give this year!

You’d think with my schedule I’d just make everyone a card or something easy for Christmas and be done with it. Nope. I apparently love to self sabbotage and decided to personalize gifts to my friends, nanny families, and clients. In case you’re wondering… that’s a lot! If you follow me on Instagram Stories, you may have seen what I lovingly refer to as “weeding day” where I weeded approximately 12897 projects and one really complicated elephant.

Show your holiday spirit or lack thereof with a sassy christmas clutch with Cricut! These are my favorite gifts to make and give this year!

Am I done yet? Heck no! But I got so excited about these Sassy Christmas Clutch that I really wanted to share them with you guys! Honestly, I think they’re stinkin cute and am particularly obsessed with adding the phrase “AF” to everything (if you couldn’t tell).

I found these in the Dollar Section at Target for $3 a piece so you can bet I hit up every target in driving distance to make sure I had enough. They have some seriously cute “alternative” holiday colors that I may have gone a little overboard. Ooof my wallet!

Sassy Christmas Clutch

Time: 15 minute
Cost: $5 each – depending on which type of vinyl you use
Cuteness level: OMG

Continue reading

7908931b45bb58060632ba4d10fa313cac59bfd6aaf838390e