Keep germs away with this DIY Hand Sanitizer Spray and these fun colorful labels! Use your favorite essential oils for a fun seasonal gift!
Okay ya’ll, tis the season as they say… for germs and colds and all the germs. So, you know… wash your hands, catch your cough in your elbow, take some zinc. BUT if you’re like me, washing your hands may be a little harder to do when you’re wrangling kids who are also sneezing and all that grossness. My solution? I carry DIY Hand Sanitizer Spray with me everywhere. I taught the kids how to use it too!
I learned how to make this at Craftcation from the lovely Joan Godspeed from Break N Remake – Go check out her YouTube for some seriously awesome sustainable DIYS! – And I wanted to add a bit of Do It Your Freaking Self to it, so I created these ridiculously sassy labels to adhere to the bottles. Wanna make your own? Let’s get started!
DIY Hand Sanitizer Spray
Time: 30 Minutes or less
Cost: $10 or less depending on what you have on hand
Usage: No germs for you!!!
Whether you’re a plant lady waiting to happen, or just have a deep love of all things cactus, this Crochet Cactus Hat Pattern is enough to make you swoon without getting prickly! A great project for intermediate crochet-ers.
My family has this tradition… or I have this tradition with my family… who knows. BUT ever since I learned to knit and crochet I make one hat a year that is usually inspired by food. And my mom keeps and wears those hats all year long. At one point there was a watermelon hat that made the rounds and we have photos of everyone including the hosted exchange students wearing it over the holidays. I know!!! Recipe for lice, am I right?!? But don’t worry, it gets washed and weirdly enough there has never been a lice outbreak at our house so knock on wood or whatever.
This year, since I’ve been living in California for a while, I decided to make a cactus hat and I gotta say… it turned out pretty nice! My sister has claimed it so look out Nashville! This is also the first hat that I’ve crochet. What I mean by that is that I usually knit my hats so this ribbed stitch was super new for me. If you’re a little nervous, don’t be. There’s a bit of a learning curve, but once you learn it, you’ll be making ribbed hats all over the place!
Crochet Cactus Hat Pattern
Cost: $10 or less
Time: Weekend project
Comfort level: Prickly (not really but it was too good to not post!)
I don’t know about you guys, but using donuts to spell out practically anything makes me super happy. I’ve been in love with all of the instagram shots of California Donuts spelling out “Congrats” for parties and things. And while I’m still a cupcake girl, I definitely love delicious donuts. So I figured… why not create my own magnets?
California Donut Magnets
Time: 2 hours + dry time
Cost: $10 or less
Fun level: SWEET
I’m writing this here at 10pm on a Thursday. I worked, went to the Doctor. And can’t find the energy to do much else. For the last few years, I’ve been existing in the world of burn out. Of not enough time and not using the time I have wisely. Of pulling myself in different directions. I don’t feel stressed out but I can tell it’s starting to take its toll.
When I started this blog, I wanted it to be a place for me to pour myself and my crafts and my creativity into. I wanted to build a community of people to communicate with and enrich lives through color and whatever. But I lost sight of that. I got overwhelmed with seeing other people’s growth, perfect photography, and instagram feeds. I’m sure all of us can attest to that in one way or another.
There have been weeks where I haven’t wanted to touch the blog. I LOVE it and what it means, but I got so stressed over the idea that posts had to be perfect. Not only that, but that I had to put forth this idea of perfection. That being vulnerable had to be carefully crafted. That being too vulnerable meant fatigue. I’ve had so many ideas ruined by the idea that things need to be perfect and clean and bright white or having perfect SEO. Or because I do things once and don’t have the supplies to do it again and forget to take photos or whatever. Being broke and crafty sucks you guys!
The truth is, I’m none of those things. I’m messy. I hate cleaning my craft space. I maybe get half of my to do list done and I usually forget to shower. I have 2am crying sessions while watching musicals. I am not as organized as I used to be. I’m not as productive as I want to be. I’m in this weird stress cycle right now and it’s really shitty to tell the truth. Those little “blurbs” before each blog, while they are carefully crafted and definitely a reflection of me, they are not the full breadth of who I am.
I want to make a commitment to be more vulnerable with you guys. I’m trying to work on things slowly but surely to create a deeper connection… possibly send out an email or two – because that is a fear. I am so scared that I’ll spend so much time working on the perfect email and no one will read it, or my bounce rate or whatever will sky rocket…. because blogging has become such a numbers game.
So bear with me please. The blog is not going away but things might change around here and if you regularly read it, I wanted to give you a heads up.
PS: If you’re all the way down at the bottom of this and have read it, here is my current music obsession – Enjoy it.
Show your holiday spirit or lack thereof with a sassy christmas clutch with Cricut! These are my favorite gifts to make and give this year!
You’d think with my schedule I’d just make everyone a card or something easy for Christmas and be done with it. Nope. I apparently love to self sabbotage and decided to personalize gifts to my friends, nanny families, and clients. In case you’re wondering… that’s a lot! If you follow me on InstagramStories, you may have seen what I lovingly refer to as “weeding day” where I weeded approximately 12897 projects and one really complicated elephant.
Am I done yet? Heck no! But I got so excited about these Sassy Christmas Clutch that I really wanted to share them with you guys! Honestly, I think they’re stinkin cute and am particularly obsessed with adding the phrase “AF” to everything (if you couldn’t tell).
I found these in the Dollar Section at Target for $3 a piece so you can bet I hit up every target in driving distance to make sure I had enough. They have some seriously cute “alternative” holiday colors that I may have gone a little overboard. Ooof my wallet!
Sassy Christmas Clutch
Time: 15 minute
Cost: $5 each – depending on which type of vinyl you use
Cuteness level: OMG
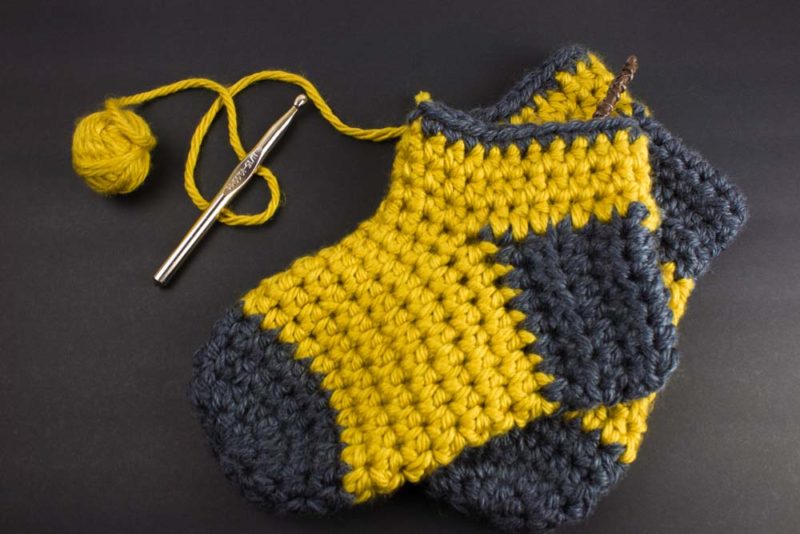
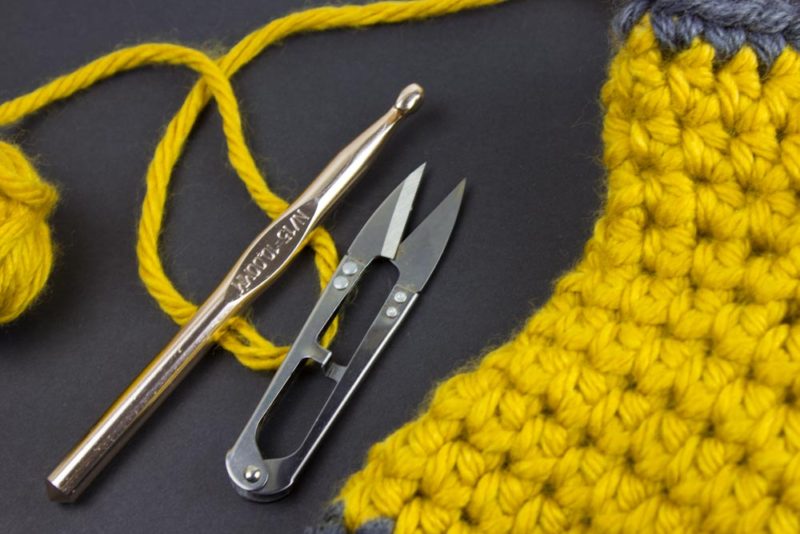
Cozy up with these crochet vintage Hufflepuff slippers! Make them yourself with this free pattern and show your house pride!
I took the sorting test on Pottermore twice. Yep. I created two separate accounts for the sorting test. Why? Because I could? Maybe? Mostly because I got Gryffindor and I secretly think I’m a Hufflepuff. I got Ravenclaw on the second test so I’m not exactly sure what to do with that. Anyone else in the same boat?
As the holidays gear up, the pressure is on when you’re a crafter. I usually try to start my holiday creating at least 2 months in advance, but I was a little late with that so here I am… rushing to crochet, knit, weed, iron and paint a ridiculous amount of stuff. Does anyone else feel like they need to top themselves from the year before? I mean, yeah. I could go the easy route and just get gift sets for people but there comes this expectation that when you’re a crafter, you hand make everything. This year, I am making a ton of these slippers and I am in love with the color scheme. You see, this year, my friends and I decided to re-read the Harry Potter series and actually analyze it for what it is. It’s amazing the things that come into play when you’re looking at something as an adult. As a result, that friend group are getting vintage style slippers in their house colors! I nearly kept these Hufflepuff ones for myself!
Time: 1-2 Harry Potter films or 5 Chapters of the audiobook
Cost: $5-10 – I found the yarn on sale – never go into the craft store without a coupon!
Nerd Level: 3 – super subtle but super cozy.
Add some vintage flare to your holiday wine with these festive DIY Vintage Christmas Ornament Wine Charms! A fun project for the holidays!
When I was a kid, we did the whole Christmas production. Every year we would go to the Christmas tree farm and cut down our own tree, then my dad would head up to the attic to haul out all of the Christmas supplies (at least 7 boxes worth) and we would spend the rest of the day and into the evening decorating the tree and house with whatever we could find in the boxes. Every year, my favorite things to hang were my mom’s vintage christmas ornaments and the blown glass bauble ornaments she bought us the year each of us were born. We don’t have those days anymore since we’re all so spread out (my parents live in Mississippi and I live out in California) but I am so thankful that my mom saves those ornaments for me to put up when I come home to visit.
These wine charms are a bit of an homage to those vintage christmas ornaments and a way for me to track whose glass is whose during those Rosé all day holiday parties. They’re not super fancy, but if you’re an artist you can make some pretty amazing things. Give it a go! I can’t wait to see your designs!
DIY Vintage Christmas Ornament Wine Charms
Time: 30 minutes or less
Cost: $15 – If you have things on hand, they’re a lot cheaper
Festive level: Maybe a 6? Continue reading
This shop has been compensated by Collective Bias, Inc. and its advertiser. All opinions are mine alone. #AGummyYouCanTrust #CollectiveBias
Keep the important things on your bathroom counter front and center with this customizeable Easy Vanity Organizer!
Is anyone else on the struggle bus when it comes to remembering to take those dang vitamins everyday? Come on… hands up! Okay, thank you. See? You’re not alone! Okay but seriously folks, if they’re not right in front of me I forget to take those things.
You see, for years, I have had daily vitamins but I kept forgetting to take them so I hoped I was getting what I needed through my diet. Fast forward a few years and my mother suggests that I probably need to remember to start taking them. Luckily we have come a LONG way since the awkwardly large, chalky daily vitamins and Nature Made® Adult Gummies have made them super easy to take! I chose Nature Made® Adult Gummies because Nature Made® has the 1st Gummies to receive U.S. Pharmacopeia Convention (USP) verification and Nature Made® gives you the assurance that you’re getting the nutrients you seek from your Gummies – so I know I’m making a good choice about what is going into my body.
The U.S. Pharmacopeia Convention (USP) is a third party nonprofit organization that verifies products for purity, potency, and quality. Also, they’re gummies! And I’m all for adulting in the funnest way possible. Learn more about Nature Made and USP here.
I’ve been taking the Nature Made® Energy†† B12 Adult Gummies and I love them. Nature Made® Energy†† B12 Adult Gummiescontain 1000 mcg vitamin B12 per serving and have delicious Cherry and Mixed Berry flavors!
To remember to keep my Nature Made® Adult Gummies front and center, I’ve created this fun DIY Easy Vanity Organizer using a fun design brush stroke design to keep things cute!
DIY Easy Vanity Organizer
Time: 10 minutes or less + dry time
Cost: $10 or less
Organization level: Boss
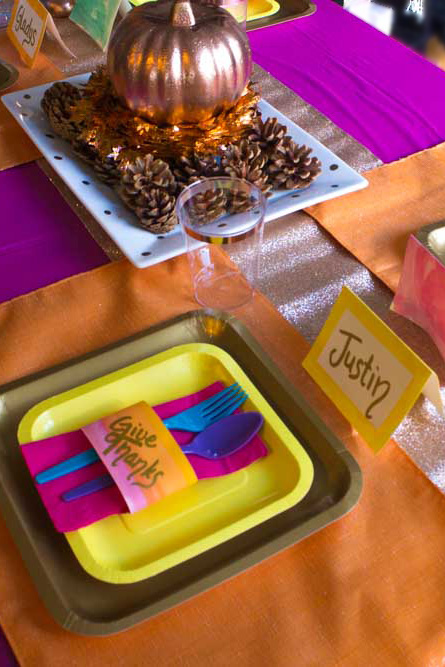
Give your Friendsgiving Tablescape a vibrant pop of color with bright orange, yellow, pink and rose gold!
Well… it has been a year. I know I’ve got over a month left to go in 2017 but Friendsgiving is my one big hosting event of the year and after it, it’s basically a race to the finish. Lord willing, this gets pulled off on November 11th – because invitations have been sent! I’m not sure you guys want me to bore you with the whole process, but in just a few days I’m going to be fitting at least 15 people into my tiny apartment. As a few of those guests will be children and I’m sending all kinds of prayers that Grampa the cat decides she’s gonna be a teenager and just stay in her room and sulk… because if she doesn’t, she’s pretty much just asking to get poked, prodded and for all intents and purposes chased around the place by tiny hands trying to pet her. Did I mention she doesn’t like kids… or people in general? Okay… enough on the cat.
This year, I wanted to go a little non-traditional with my colors and place settings. Instead of Turkey plates and fall leaves, I tried to use elements that can be re-used throughout the year and of course feature the most popular color of the year – Rose Gold. I also wanted to keep in mind that most of our furniture is dark so I wanted to bring some brighter colors in while not ignoring the colors of our home.
I usually serve everything buffet style, but I keep seeing all of these amazing tablescapes on pinterest and instagram and I really wanted to try my hand at one. So I partnered with Oriental Trading to create this beautiful vibrant Friendsgiving tablescape. Continue reading
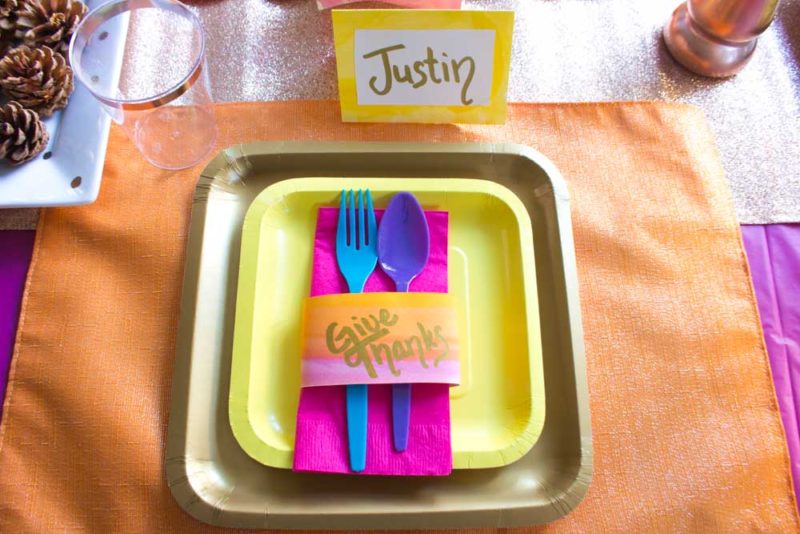
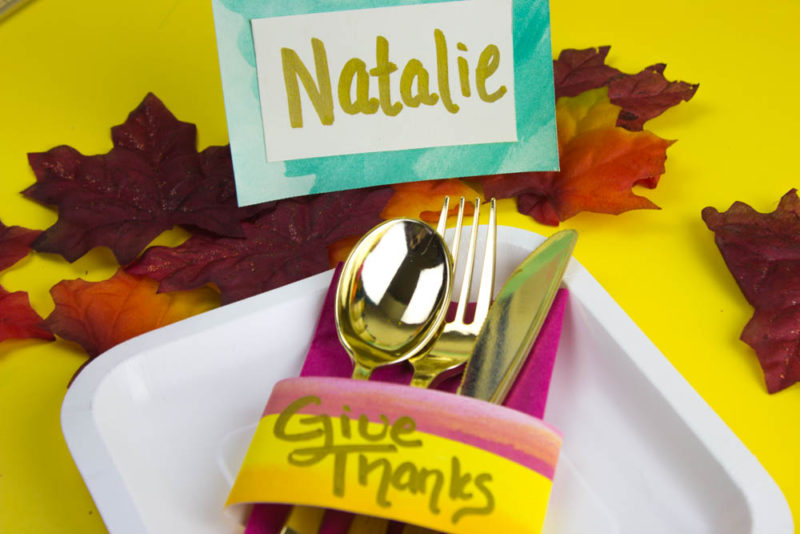
These simple watercolor napkin rings and place cards are a classy addition to any party table setting! Use them for buffet labels too!
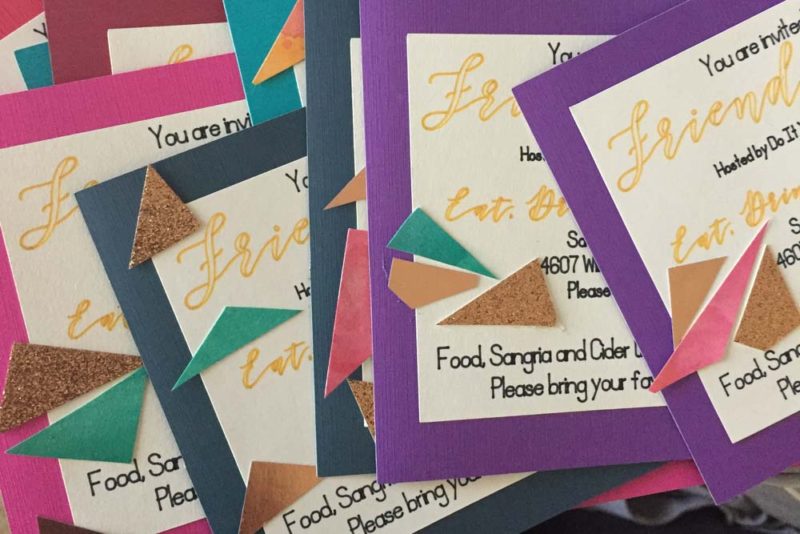
Y’all, I got super fancy with friendsgiving this year. I sent out actual paper invitations that I hand made and “hand” wrote (with myCricut Explore Air 2) and sent snail mail with hand lettered envelopes. I’m so excited about them!!
To create the invites, I used little triangles of watercolor paper for texture. So to continue that idea, I decided to make some watercolor napkin rings and place cards to bring the whole thing together. They look ridiculously classy and are so simple to make you’ll be making them for everything!
Watercolor Napkin Rings and Place Cards
Time: 1-2 hours depending on how many you make
Cost: $5 or less
Classy level: AF Continue reading