
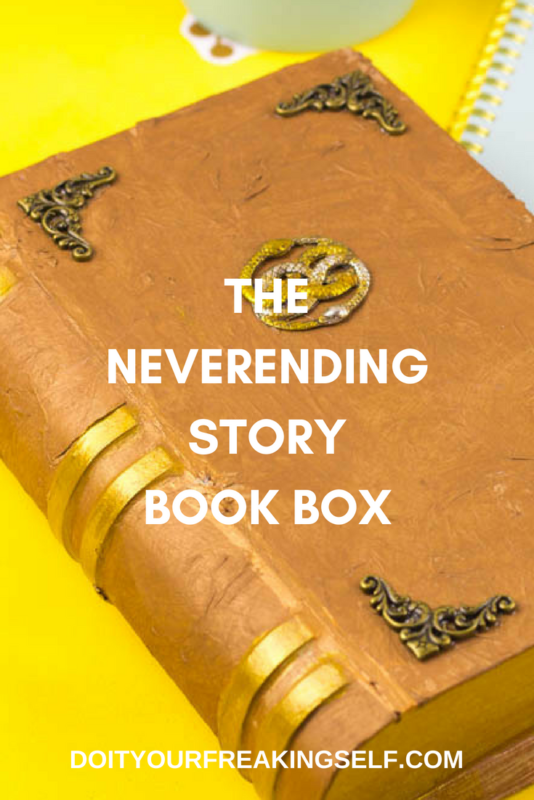
Add some geek chic to your home with this Neverending Story Book Box!
This post has been a long time coming you guys. Seriously like I bought the supplies for it a year ago – long time coming. So yeah, great idea…. lots of time spent googling on execution and I am so glad to say that this Neverending Story Book Box is FINISHED!
Okay, story time-ish. Maybe. Eh, here’s some random things about my relationship with this series.

When I was a kid, Falcor the luck dragon weirded me out but I still wanted to hang with him because DUH! Luck!
MAKE IT: DIY Harry Potter Makeup Brushes
I cried actual tears, multiple times when Artax died. I dare anyone not to. If you did, comment so I know I’m not alone okay? You can use like an emoji or a code word if you’re too cool to come out and say it.
The giant turtle is also weird, but I did not want to chill with him.
Okay, so basically everything about that movie weirded me out as a kid and I don’t think I’d let any of the kids I nanny for watch it. That’s not even counting the second one in which my dad says I begged and begged to see it in theaters then hid behind a chair because it was scary. Ya’ll, I don’t remember this but I was probably only 3, so ya know. Priorities.
Wanna make your own Neverending Story Book Box? I saved your a lot of time googling techniques and stuff. You’re welcome.
Neverending Story Book Box
Cost: $20
Time: Weekend project (there is a lot of drying time)
Suggested Viewing: The Neverending Story – Duh!
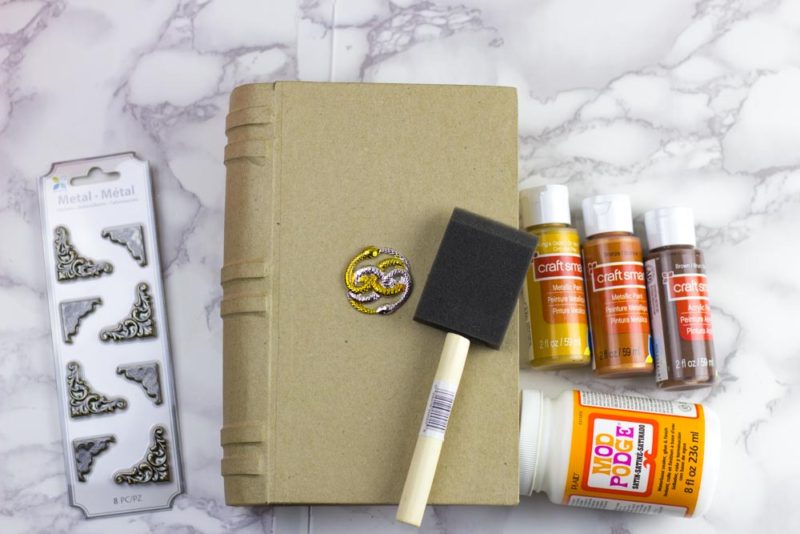
Supplies:
Large paper mache book
Tissue paper
Mod Podge
Paint brush
Metal Corner Embelishments (found in the scrap book section)
Brown (light and dark shades), Antique gold, and bronze paint
Auryn necklace
You ready?
To make the book part, we’re going to use the tissue paper to create a leather like texture. Crumple up 2 sheets of tissue paper. Spread them out and crumple them again. Then rip them into small squares or strips.
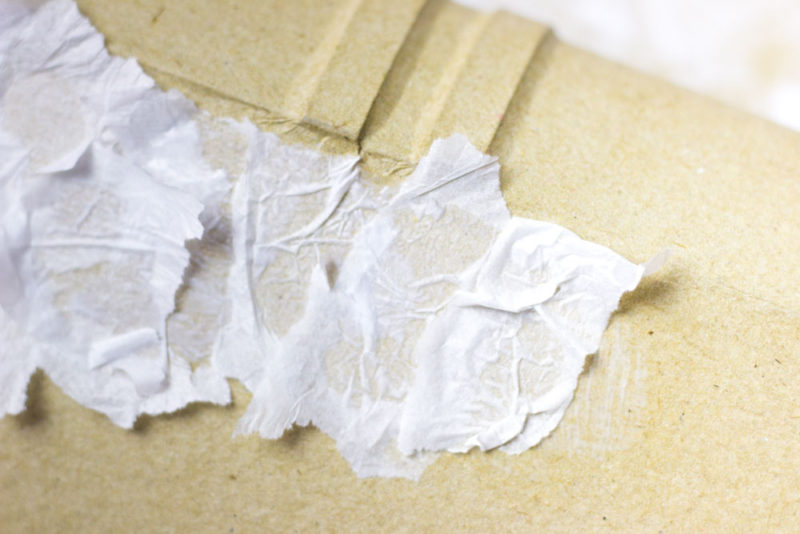
Paint a layer of mod podge onto a corner of your paper mache book. start layering tissue paper. You’re going to layer in small sections as you go. Don’t worry about overlap too much. I only worked one side at a time, but you are welcome to do the whole thing. I did not do this to the “binding” side but you can!

Once you’ve covered the surface with tissue paper and mod podge go back over it with another layer of mod podge. This will squish down all of the tissue paper and give you a cool “old leather” texture.
Paint over the mod podge with brown acrylic paint and let it dry. You can then go in with a dry brush with gold to give it a little bit more depth. To do this, take a large dry, stiff brush and work the paint into it. You don’t want globs or clean lines. Gently but swiftly brush it over the area you want to paint.
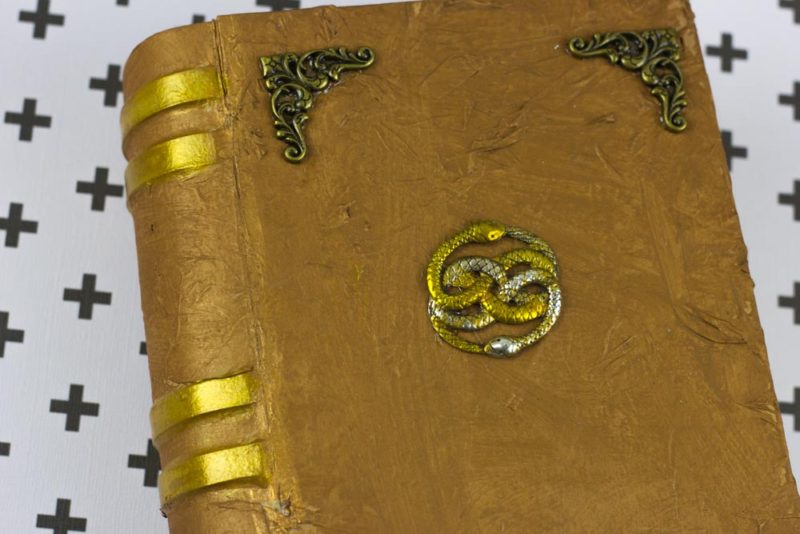
While the book is drying, paint your embellishments.
For the Auryn: Use wire cutters to cut off the necklace loop at the top of your Auryn.
Paint it over with a thin layer of brown acrylic paint, let dry. Then a thin layer of bronze acrylic paint. Its okay if some of the color shows through. Allow it to dry and paint over it again with a super thin layer of gold. We’re going for dimension here, not perfection. Let it dry.
MAKE IT: DIY Game of Thrones House Sigil Glasses
For the corners: If your embellishments aren’t aged, paint over them with the brown paint before proceding to the next step.
Paint over your embellishments with a bronze acrylic then wipe it off with a paper towel. This will hopefully give you a cool aged affect. If you don’t like that, just keep it 100 and paint them bronze!

Paint the “Pages”: I got fancy and wanted gold gilded pages, because Why the Eff not? You don’t have to, you can just paint them cream but that’s totally up to you.
Ready to assemble? Glue your embellishments on to the corners of your book using E6000 – if your corners have stickers, you can use those as well.
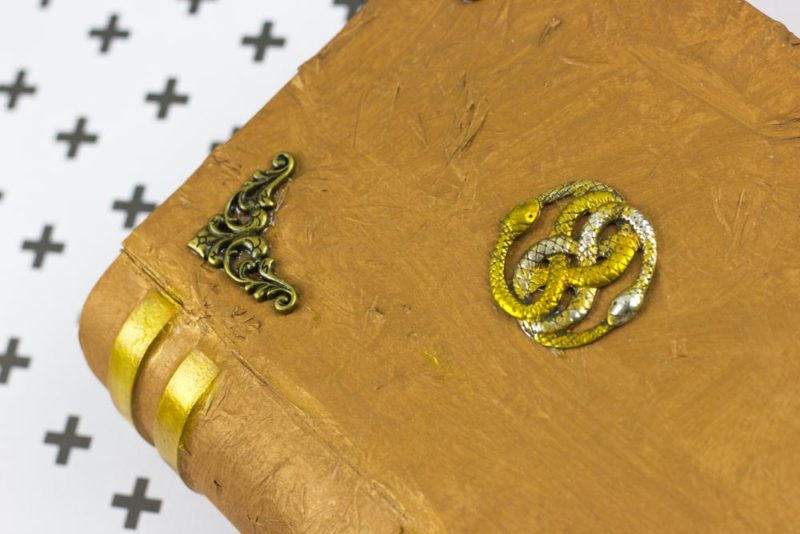
Attach your Auryn to the center of the top half of your book using E6000.
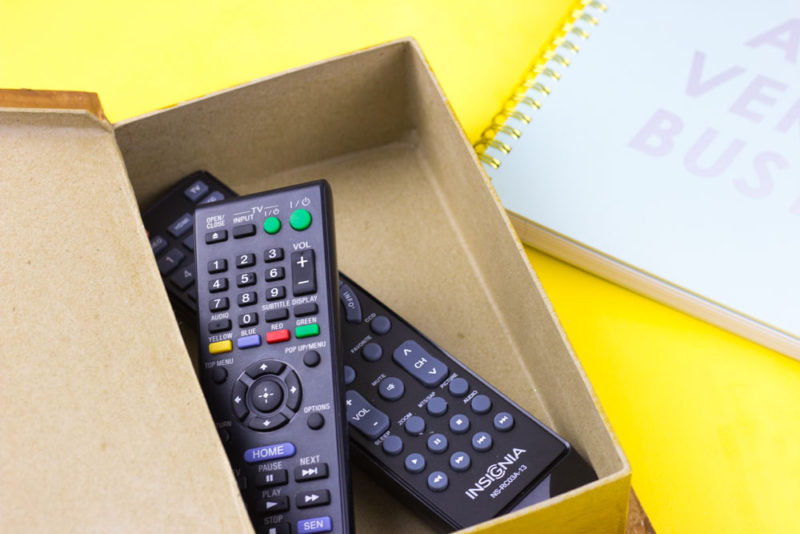
You’re done! You made a book! And not just any book, but a book BOX to hold all of your neverending stories (okay that was really cheesy). But seriously, I’ve been using mine to hold remotes – or Washi tape if you’re feeling fancy!
Happy making!


2 Comments
THIS IS SO AMAZING! I love this throwback to the Neverending Story! (p.s. You should totally make a similar project at Halloween for the boooOOOk from Hocus Pocus!)
July 1, 2018 at 3:59 pmOMG! I hadn’t thought of that! I should totally figure that out.
July 10, 2018 at 9:56 pm